How to Solve the Crackme Challenge (A Small Reverse Engineering Puzzle)
Welcome back my fellow hackers! Recently, I’ve been delving into the incredibly interesting world of reverse engineering! I hope to write more about this topic some time in the future, but for now we’ll just start with something simple. I took a few days and made a small reverse engineering challenge. Today, we’re going to go through this challenge and solve it with all 3 intended solutions (if you can find more, leave them in the comments!).
We’ll start with downloading and compiling the challenge, then we’ll start solving it. Our first solution will be a buffer overflow vulnerability intentionally coded into the challenge, then we’ll hunt down and execute a secret function to solve the challenge, and finally we’ll execute the program instruction to instruction until we can read the solution straight out of the computers memory! Now that we know what we’ll be doing, let’s get started!
Downloading and Compiling the Challenge
First, we need to download and compile the code of our challenge. Let’s download the challenge code from pastebin using the curl command:

We’ve written the code to a file named crackme.c. Now that we have our code, we need to compile it. We’ll be using the GCC (GNU Compiler Collection) to compile our code. Pay close attention to the flags used when compiling our code, as they are important to the challenge functioning properly:

You may get a warning out of the compiler but don’t fret, the code will still work (this warning is related to the buffer overflow vulnerability, which is intentional). Let’s test our executable just to make sure it works:
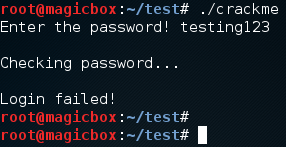
Now that we have our code compiled and working, we can start cracking this challenge! We’ll start with the buffer overflow vulnerability.
Cracking the Challenge
Solution 1: Buffer Overflow
Buffer overflows are very common vulnerabilities. A “buffer” is simply an area of memory designated for storing data to be processed or used in processing. If we can fill a buffer with more data than it can handle, we “overflow” it, and can then store data in areas of memory where we shouldn’t be able to. This can lead to code execution, which is how a lot of buffer overflow exploits work. But, in our case, we’ll be overflowing a buffer simply to change the value of the data being held in another.
Let’s perform this attack, and then we’ll take a look at the code that makes this possible:

We can see here that by entering a large amount of text, we can successfully login even when this is obviously not the correct password. Now that we’ve exploited our buffer overflow, let’s take a look at the code that made this happen:
We can see here that we make a character array that holds 30 characters. So, if we input more than 30 characters, that will overflow this buffer, which will change the value of the “valid” integer. This integer is then evaluated later in the program and, since the overflow changed it to a non-zero number, it equates to true and logs in without a problem. Next up, we’ll be hunting for a hidden function in our program!
Solution 2: Using the Hidden Function
If you read the code of our challenge, you’ll that there is a function named “secret.” This function is never used, yet it still exists. If we can force this function to execute somehow, we could get the password we need. Well we have just the tools to do that! First, we need to use a tool called objdump (object dump) to disassemble our executable into assembly. Then we’ll be able to see where our secret function is:
Now that we have our new assembly code in a text file, we can sift through it until we find our secret function. It should be just above the main function, and looks something like this:
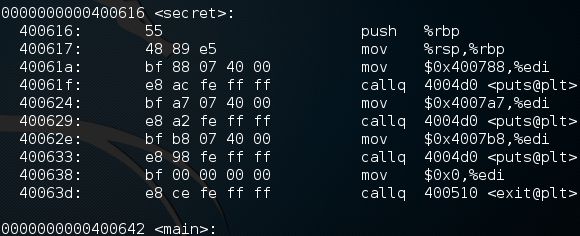
Now, don’t panic, this looks way more complicated than it is. The only part of this assembly we need to pay attention to is the string of characters next to the word “secret.” Specifically, we need to remember the last 7 characters, as this is the entry address for this function. Now that we have this 7 character string, let’s start our program in GDB and do some magic:
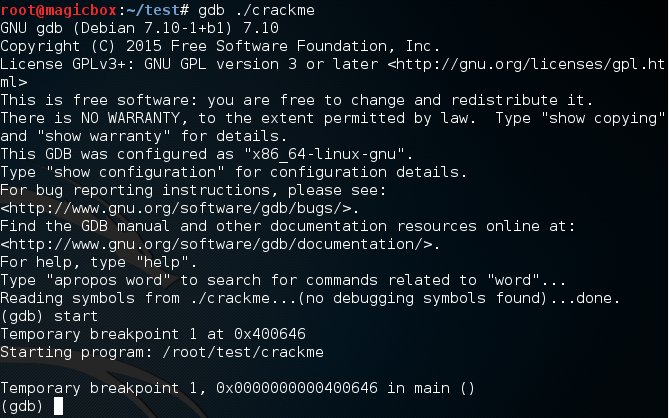
No need to pay attention to this large chunk of text, it’s mostly just information about GDB. But here’s the important part: when GDB starts up, we need to use the start command in order to start our program. Now, remember that 7 character string? This is where we’ll be using it. If we can change where the instruction pointer is pointing, we can force it to execute our secret function. Luckily for us, GDB allows us to do just that:
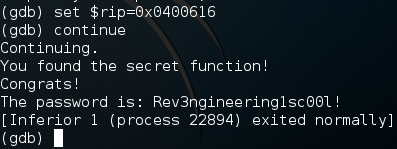
We need to precede our string with a “0x” as this specifies it as a memory address. Now that we’ve wrapped up this solution, on to the next, reading the password out of memory!
Solution 3: Reading the Password out of Memory
SIDE NOTE: For this solution to work you may want to re-compile the program with the -m32 flag to compile a 32-bit version of it.
Our final solution is the most complicated. When we enter a password into the program, it needs to be stored in memory so it can be evaluated later. If we can catch it while it’s stored in memory, we can read it! We can also use GDB for this. So, let’s start up GDB again:
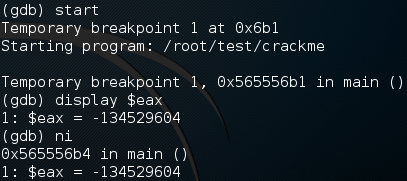
I’ve cut out the large chunk of text shown by GDB for the sake of organization. Now, we need to start the program with the start command. Once we do, we display current number of the EAX register. This is the register that our password will be in once we enter it. After we display the current contents of EAX, we use the ni command (next instruction) to move on to the next instruction in the program.
As you can see by the output above, once we used the ni command, it displayed the value of EAX again. We can use this to tell when the value in EAX changes, if the number changes, the contents changed. Now we just need to repeatedly press return to re-execute the ni command and step through our program. Once we reach the prompt for a password, enter something random:
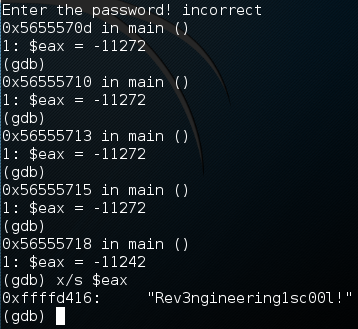
We can see that a few instructions after we entered an incorrect password, the value of EAX changed. Now we can use x/s to read the contents of EAX as a string which, in this case, is the correct password to our program!
This concludes our small reverse engineering article. I’d like write more about this in the future, but since I’m still learning myself, we’ll have to save it for another time. Just know that this idea is on the back-burner for now!
Comments