Evading Anti-virus Part 2: Obfuscating Payloads with Msfvenom
Welcome back hackers. In the last edition of our journey into evading anti-virus, we used Shellter to infect EXEs with a payload. Today we’re going to be taking it down a notch and talking about obfuscating payloads with msfvenom.
Obfuscation is the concept that we can take our payload and change its signature. If we can change its signature, it can help us to get past anti-virus. Obfuscation in and of itself is usually not enough to fool today’s anti-virus, but it may be effective against out-of-date or some lesser anti-virus software. That being said, its still important that we review and understand obfuscation so we can implement it along with other techniques.
Since obfuscation alone will likely fail, I’ll be using VirusTotal. So, let’s get started!
Step 1: Generate Un-encoded Payload
We’ll be generating two payloads, one encoded and one unencoded. But, before we do either, we should take a look at the msfvenom help page, which we can see by using the –help flag at the command line:
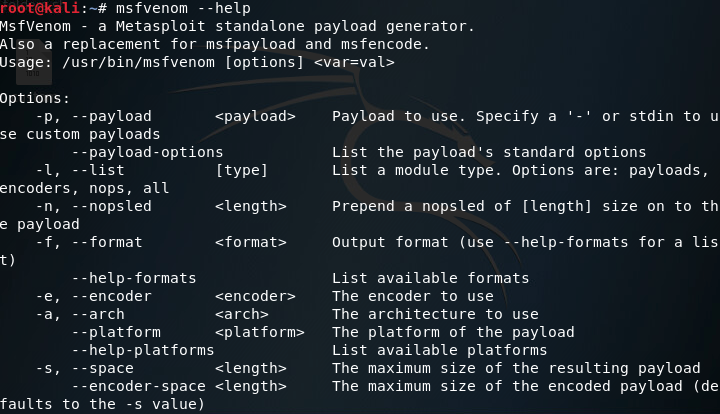
The only flags we need are -p, -f, -a, –platform, and -o. This will allow us to generate an EXE of the unencoded shellcode. We’ll also need to set the LHOST and LPORT variables when we create our payload. LHOST should be the machine the payload will connect back to, and LPORT should be the port to connect on. Now that we know everything we need, let’s put it together and generate our unencoded payload:

Alright, we have our first, unencoded payload. Now we can make our encoded payload, after that we’ll be able to see the difference.
Step 2: Generate Encoded Payload
Now we’re getting into the point of this article. Msfvenom comes with many encoders, which are all options for different ways to encode our payload. To view the encoders that we can use, we need to give the –list encoders flag when we call msfvenom:
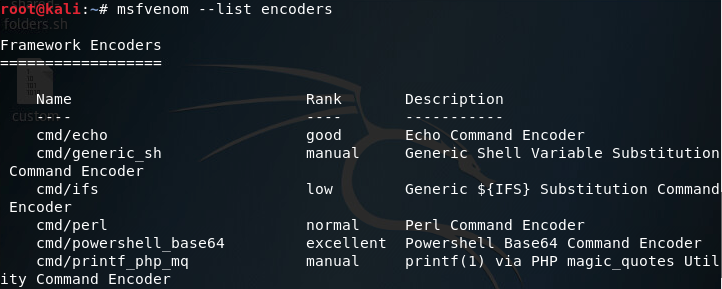
There are way too many encoders to fit into a single screenshot, but you get the gist, there’s a lot of encoders. The one’s we’re going to be using today are shikata_ga_nai and countdown. Shikata ga nai is a polymorphic encoder, which means that it will change the signature of the file every time we use it. I’m using countdown in conjunction with shikata ga nai just to show an example of using multiple encoders for a single payload (feel free to use whatever encoders you want).
In order to generate our encoded payload, we need the -e and -i flags. These flags will allow us to specify an encoder, and the amount of times to iterate the encoder over the shellcode. In order to use multiple encoders, we need to use msfvenom and output our encoded payload in the raw format, which we then pipe into another msfvenom command. After all encoding is complete, the final msfvenom command will format it into an EXE. Let’s see it:

Once this process gets going we’re going to see a lot of output. Now that we have our payloads, we can move on to running them against VirusTotal.
Step 3: Check our Payloads against VirusTotal
We’ll start with our unencoded payload. We just need to use the File option on the VirusTotal site:
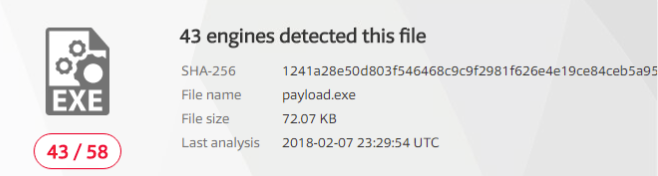
Alright, so most anti-virus software detected our payload. Now that we have that baseline, let’s try the obfuscated payload and see if our results are any better:
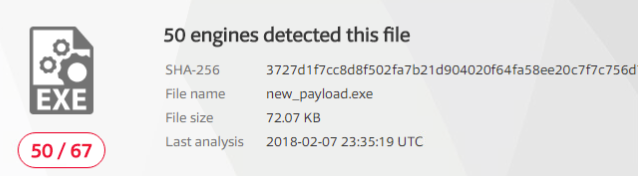
So we have our results, but I hate fractions, so I took the liberty of converting our fractions here to percentages with Python:
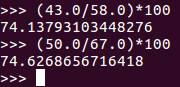
As we can see, our obfuscation didn’t do much (as expected). But, if we were to combine this obfuscation with other anti-virus evasion techniques we might stand a better chance. Next time we’ll either be using a program called Veil for other obfuscation techniques, or a tool called AVET (Anti-Virus Evasion Tool) to use some entirely different techniques (I haven’t decided which yet). I’ll see you then!
Comments