Useful tools for creating GIFs
In the event that you have three quid to burn, we suggest getting either GIF Brewery or PicGIF from the App Store.
PicGIF is somewhat prettier and less demanding to utilise, yet GIF Brewery gives you better control over the improvement and conduct of completed GIFs. You don’t really need to spend a solitary penny to make enlivened GIFs, however.
GifGrabber, a free bit of programming that you can download for nothing from the Mac App Store that permits you to choose a bit of your Mac show, record it and change it into a GIF.
GIFGrabber is a phenomenally simple bit of programming to utilise and something that anybody can utilise.
Furthermore, we’ll take a gander at the new Imgur Video to GIF device, which changes over segments of online video cuts into GIFs with irrefutably the base of object – it’s magnificently simple and advantageous, and it’s the strategy we’d prescribe for fledgelings.
At that point a short time later we demonstrate to you best practices to make enlivened GIFs (again for nothing) utilising the QuickTime Player application that is packaged with your Mac and the free form of PicGIF – PicGIF Lite, accessible on the Mac App Store and online administration EzGIF. This is somewhat more propelled; will utilise this to make a vivified GIF with a content inscription, which is something that is exceptionally well known when utilising GIFs as silly images or to share humdingers from TV sitcoms.
Steps to make an animated GIF using GifGrabber:
- GifGrabber is a free piece of software available to download from the Mac App Store, completely free of charge. The best part of GifGrabber is that it is not exclusively for one service – whatever you display on your Mac can be converted into a GIF extremely quickly and extremely easily. We’ll show you how I made a GIF with a video of the Blue & Black/White & Gold dress.
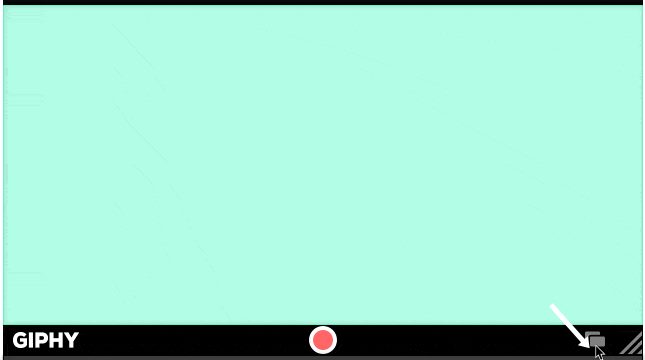
- After downloading GifGrabber from the Mac App Store, we opened the software and a green square appeared on-screen.
- We could then load up the video that we wanted to create a GIF of – in this case, a vine – and rearrange the box to fit the video perfectly. Then all we had to do was click “Start Recording” to start creating the GIF – even though you have a maximum of 30 seconds to use, try to use as little as possible as GIF files can be quite big.
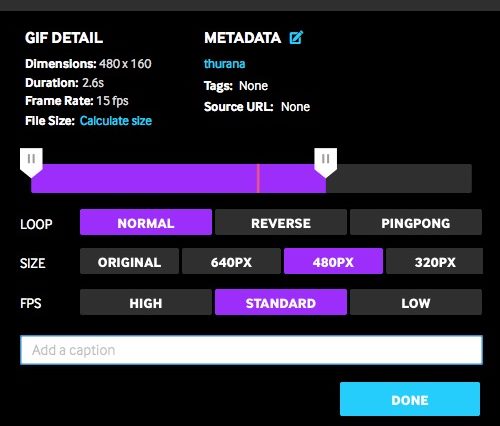
Create an Animated GIF Screenshot On Mac - Once your GIF has been captured, click the GifGrabber logo in the Menu Bar and select your GIF. You can then resize your GIF to make the file smaller, trim it so it’s perfect and even generate a URL for it, ready to be shared. You can also export it normally.
Create an Animated GIF Screenshot On Mac - Once you’ve saved your GIF, you’ll be able to do as you please. It’s important to note that once you quit the app, all unsaved GIFs will be discarded so make sure everything you need is saved before closing!
Create an Animated GIF Screenshot On Mac

So above discussion is all about How To Create an Animated GIF Screenshot On Mac, Use the guide and you can easily create animated screenshots using the above-discussed tool. Hope you like the guide, keep on sharing with others too, Leave a comment below if you have any related queries with this.
Comments